Welcome to Delicate template
Header
Just another WordPress site
Header

More and more people are aware that ripping Blu-ray to Plex give them easy access to their Blu-ray movies and convenient Blu-ray streaming on Apple TV 4, Roku, PS4, etc. In the ripping process, the choice of output format will determine your playback result. If you rip Blu-ray to lossless MKV, you can keep lossless quality of the whole Blu-ray while choosing to rip Blu-ray to H.264 MP4 brings you more wide streaming choices. So, which fotmat would you want to choose and how to rip Blu-ray to multi-track MKV or H.264 MP4 format?

""just installed the PLEX app on my ATV4! Very excited. I’m trying to convert all my blurays to digital files I can access easily. 
If I rip a bluray into an MKV will it stream full quality to PLEX if I set the stream settings to ’1080p Unlimited’? Full quality? Same as the physical disc? Or is PLEX still going to compress it somehow?

"I’m currently in the process of making plans to embrace Plex and moving all my video content to a media server. This task will require my ripping over 500 Blu-rays and I’m rather keen to do straight 1:1 MKV rips of my library to avoid any loss in quality (I’m quite aware what this will cost me in storage). Can someone recommend a easy-to-use ripper?"

Before we decide the format to rip Blu-ray for Plex, we should know what video format is better for Plex. From support.plex.tv/ site, content matching the following can usually be Direct Played:

  • MP4 container
    • Video Encoding: H.264, H.265 (HEVC), mpeg4, VC-1
    • Audio Encoding: AAC, AC3, EAC3, MP3
  • MKV container
    • Video Encoding: H.264, H.265 (HEVC), mpeg4, VC-1
    • Audio Encoding: AAC, AC3, ALAC, FLAC, MP3

it seems that both MP4 and MKV are OK for Plex. So just let’s start to learn how to rip Blu-ray to Plex in multi-track MKV and H.264 MP4.

Step 1: Get a Blu-ray Ripper to start ripping

At first, you should download a Blu-ray Ripper that can help you convert Blu-ray to both multi-track MKV and H.264 MP4. Here we recommend you Pavtube ByteCopy for the following reasons.

- Rip any commercial Blu-ray: AVC Blu-ray, MPEG-2 Blu-ray and VC-1 Blu-ray.

- Decrypt any Blu-ray BD+, UOP, AACS up to MKB v61.

- Rip Blu-ray to Plex in lossless/uncompress MKV with all sub/audio track.

- Copy Blu-ray to H.264 MP4 AAC video to Plex for wide streaming.

As the best Blu-ray ripping tool, ByteCopy has many other features. If you want to learn about it, please read ByteCopy review. And for Mac users, Pavtube ByteCopy for Mac is the selection.

Step 2: Load Blu-ray to Blu-ray Ripper

Insert your Blu-ray disc to external or internal Blu-ray Drive. Then install and launch Pavtube ByteCopy. At the left top of the interface, click "File" to load Blu-ray Blu-ray discs from "Load from Disc". Maybe you have copied Blu-ray to hard drive in ISO image, if so, choose "Load from ISO/IFO" to add Blu-ray movies. This Blu-ray Ripper will automatically detect the mian title of Blu-ray movies to rip and convert to Plex.
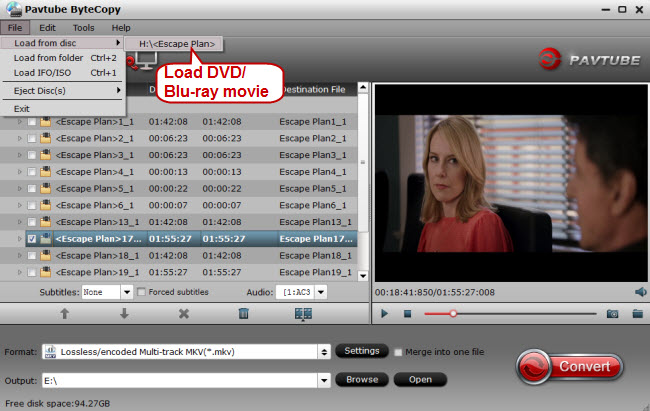
load dvd blu ray movie for storage on pc Rip Blu ray to Plex server with multi track MKV or H.264 MP4 Format

Step 3: Choose multi-track MKV and H.264 MP4 format

This is the most important part of the ripping process. Please think over what format you want and follow the path to choose it.

Option A – Rip Blu-ray to multi-track MKV for Plex

To choose multi-track with multiple subtitle and audio tracks, select Multi-track Video > Lossless/encoded Multi-track MKV(*.MKV) for output. In this way the original audio tracks are streamed without transcoding from source BD Disc to saved MKV file. But this way will preserve original TrueHD/Dolby Digital/DTS/PCM audio and at present, Plex doesn’t support for 3rd-party applications to play DTS audio. Content with DTS audio will have the audio automatically transcoded by the Plex Media Server in order to preserve the surround sound audio channels. So you’d better to click "Settings" windows, in Audio column to uncheck DTS audio to keep only AAC or AC3 audio.
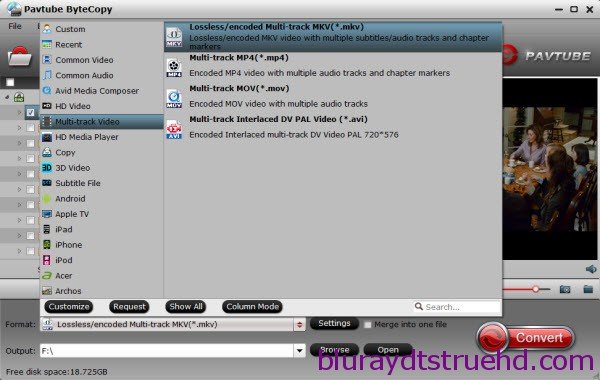
lossless mkv format Rip Blu ray to Plex server with multi track MKV or H.264 MP4 Format

Option B – Rip Blu-ray to H.264 HD MP4 for Plex

Click “Format”to open the drop-down list, you can definite MP4 as the target format from "HD Video" catelog. This format allows you to stream media with Plex on Apple TV 4, Roku, HD TV, etc. After choose MP4 format, please click "Settings" to check out if the audio codec is AAC or AC3.

rip blu ray dvd to mp4 mkv avi plex roku Rip Blu ray to Plex server with multi track MKV or H.264 MP4 Format

Step 3: Start Blu-ray to Plex ripping

Save all your settings, and back to ByteCopy main interface, hit the “Convert” button to start converting. When the Blu-ray to Plex ripping completes, you would get a single large MKV file or H.264 HD MP4 files saved in output file destination. And you could play copied Blu-ray MKV movie or MP4 video with your Plex on various devices.

Note: This method is also suitable for ripping DVD to Plex.

Related Articles:

share medium Rip Blu ray to Plex server with multi track MKV or H.264 MP4 Format

You perhaps have ripped DVD/Blu-ray to ISO image to hard drive or download some movies from internet which are saving as .iso extension. When you play videos on PS4/PS3 from USB hard drive, have you tried to play these ISO image on PS3/PS4? If you tried, you will find that you will get failure when playing ISO image on PS3/PS4.

iso to ps3 ps4 How to Play ISO Image on PS3/PS4?

Does PS3/PS4 support ISO image?

In fact, PS3/PS4 support limited video when play HD videos from USB Hard Drive. And unfortunately, ISO in not in the supported list of PS3/PS4. You can learn which format that PS3/PS4 support to play via external hard drive.

Note: The PS4 media player only accepts FAT and exFAT formatted USB drives.

MKV
Visual: H.264/MPEG-4 AVC High Profile Level4.2
Audio: MP3, AAC LC, AC-3(Dolby Digital)

AVI
Visual: MPEG4 ASP, H.264/MPEG-4 AVC High Profile Level4.2
Audio: MP3, AAC LC, AC-3(Dolby Digital)

MP4
Visual: H.264/MPEG-4 AVC High Profile Level4.2
Audio: AAC LC, AC-3(Dolby Digital)

MPEG-2 TS
Visual: H.264/MPEG-4 AVC High Profile Level4.2, MPEG2 Visual
Audio: MP2(MPEG2 Audio Layer 2), AAC LC, AC-3(Dolby Digital)
AVCHD: (.m2ts, .mts)

Best ISO to PS3/PS4 Converter to convert ISO to PS3/PS4

If you want to play ISO image on PS3/PS4, you need to convert ISO to PS3/PS4 supported format. Pavtube ByteCopy is the most professional ISO PS4 Converter which can help us easily solve all the “PS4 ISO” and “ISO PS4″ problem. It is definitely NO.1 choice to convert ISO to PS3/PS4. In addition, there are more powerful features for us:

  • Best tool to get rid of “Can’t play ISO on PS3” “Fail to play ISO on PS4”“ Does PS4 play ISO?” “Will PS3 play ISO?” problems.
  • Convert PS4/PS3 unsupported ISO to PS4 recognized MP4, MKV, AVI  format for playing.
  • ISO to PS4/PS3 Converter has both Windows (Windows 10/8 Included) and Mac version (Mac OS X 10.11 El Capitanand Mac OS X 10.10 Yosemite Included).
  • Video editing functions: merge or join videos together, cut videos, crop videos, add watermark to videos, rotate videos, add/extract subtitle to/from videos, adjust video channel, remove black bars, and adjust the video and audio bitrate and resolution and more.

Free download and install:
mac download How to Play ISO Image on PS3/PS4?mac buy How to Play ISO Image on PS3/PS4?

Steps to Convert ISO to PS3/PS4 Supported Format

Step 1:  Launch the best ISO to PS3/PS4 Converter and click the disc button to load DVD ISO files. If necessary, you can double click the each file to have a preview.

bytecopy import video How to Play ISO Image on PS3/PS4?

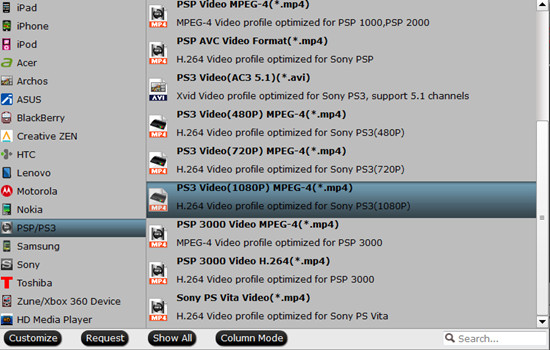
Step 2: Select the right formats for playing on PS4. Here we suggest you to go to the “PSP/PS3” list, you will get the “PS3 Video (1080P) MPEG-4 (*.mp4)” as the best output.

ps3 How to Play ISO Image on PS3/PS4?

Tip: In the “Settings” button, you can adjust video and audio settings, including codec, bit rate, frame rate, sample rate, and audio channel.

Step 3: Click the “Convert” button; it will change ISO files to PS3/PS4 supported file type immediately. You can find the process in the “Conversion” interface. After the conversion, tap Open button to get the output videos ready to be added to PS3/PS4 easily.

Now, the “Can’t Read ISO on PS3/PS4” issue has been solved. If you have some MKV, MP4, AVI in PS3/PS4 unsupported codec or some VOB, M2TS, WMV, FLV, 3GP, etc video that PS3/PS4 can’t play, Pavtube Video Converter Ultimate can help you convert MKV to PS3/PS4,AVI to PS3/PS4MP4 to PS3/PS4Blu-ray to PS3/PS4DVD to PS3/PS4, etc issues. And there are a bundle software promotion:

ByteCopy($42) + Video Converter Ultimate($65) = Only $79.9, Save $27.1

Related Articles:

share medium How to Play ISO Image on PS3/PS4?

We travel a lot an have over 500 DVDs in hand, so I bought a 2TB Seagate Wireless Plus then my family members don’t have to fight over the laptop for watching DVD movies. In fact, we can get together with friends and family to enjoy DVD movies via Wireless Plus, the question is: how to convert DVD for uploading to Seagate Wireless Plus?

play dvd via seagate wirelss plus Enjoy 500 DVDs via Seagate Wireless Plus at Free Times

Here what you need is to make use use of a professionally designed DVD to Wireless Plus converter to rip Seagate Wireless Plus video files. And Pavtube DVDAid would be your best choice, which can easily rip DVD movies to Wireless Plus compatible H.264 video, MPEG-4, and Motion-JPEG for video, and AAC, MP3, Audible (formats 2, 3, 4), Apple Lossless, A IFF, and WAV for audio quickly with excellent output video quality.

Besides converting DVD files, it can also compress a DVD to smaller file size, saving the space for your console if you need. In addition, the built-in editor allows you to customize your DVD videos to get the very part and effect you want with ease. I have tested it, now after perfectly ripping DVDs, I can get my DVDs uploaded to my 2TB Seagate with ease and freely watching on my mini iPads, 1 kindle and 1 nook. The equivalent Mac version is DVDAid for Mac. Just get the right version and copy DVD to Wireless Plus with ease. (Windows 10 or Mac Yosemite are supported).

windows download Enjoy 500 DVDs via Seagate Wireless Plus at Free Times windows buy Enjoy 500 DVDs via Seagate Wireless Plus at Free Times

Other Download:

- Pavtube old official address: http://www.pavtube.cn/dvd_ripper/
- Cnet Download: http://download.cnet.com/Pavtube-DVDAid/3000-7970_4-76158510.html

1. Load DVD movies

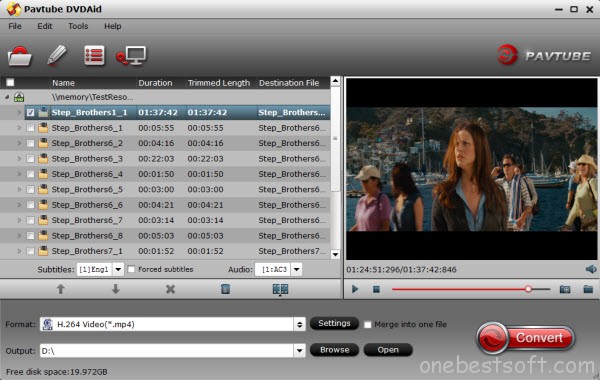
First, insert your DVDs into DVD Drive, and then drag the DVD files to the program; Or you can get to “File” Menu, click “Load DVD” to draw into DVD movies you want to rip. DVD folder and ISO image files are supported as well.

windows 10 dvd ripper Enjoy 500 DVDs via Seagate Wireless Plus at Free Times

2. Select Seagate Wireless Plus compatible formats

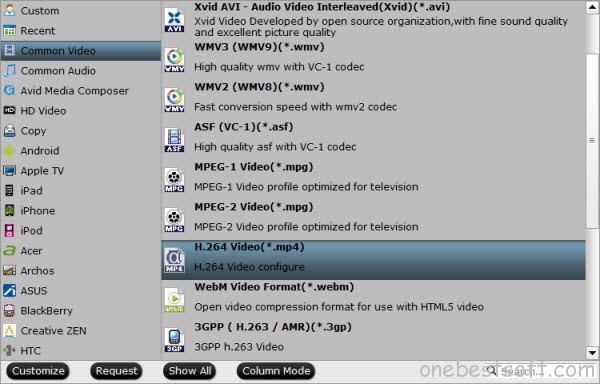
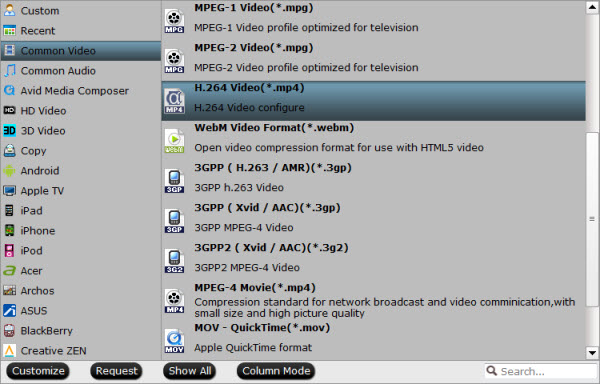
Click the Format bar to select output profile for your Wireless Plus, say “H.264 Video(*.mp4)” from “Common Video”.

best playback format Enjoy 500 DVDs via Seagate Wireless Plus at Free Times

3. Convert DVD movies to Seagate Wireless Plus

After all necessary settings, you can just click the “Convert” button to start converting your DVD movies. After the conversion, click Open to get the output files for your Seagate Wireless Plus.

4. Connect Seagate Wireless Plus to computer for uploading

Now you can copy the converted DVD files to your Seagate Wireless Plus via USB.

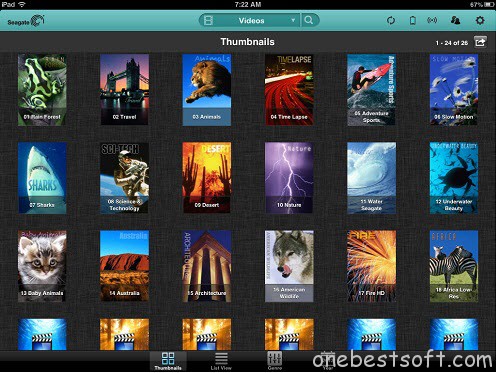
Tip: Free apps are available across Android, iOS, and Kindle for download, and after downloading the app, users can view available wireless networks and select the Seagate Wireless. And content can be played in many different ways, via the Media app on iOS, Android, or Kindle Fire, via any browser, via Apple Airplay or to any DLNA devices via minidlna, which is built into the OS.

seagatewirelessplus upload Enjoy 500 DVDs via Seagate Wireless Plus at Free Times

To play your converted files on your mobile devices, your just need to tap the movie file and play it. Now you have successfully carry your entire DVD media library with you with the Seagate Wireless Plus Portable Hard Drive. Just enjoy while traveling with your family!

Want to get more DVD entertainment? Rip DVD to your Nexus 6/9iTunes 11/12 library or Drobo 5n and TV!

Read More:

Source: http://onebestsoft.com/upload-dvds-to-seagate-wireless-plus/

share medium Enjoy 500 DVDs via Seagate Wireless Plus at Free Times

“I’m going to buy a Chromecast. But friends tell me that I can not play my backed up Blu-ray and DVD ISO files on Chromecast. Is it ture? If it is possible to do it, then how?”

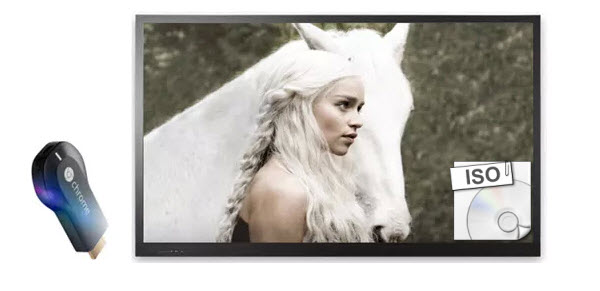
You may know that you can just drag a local movie file to chrome browser’s address bar and cast it to the big screen with Google Cast the chrome extension via Chromecast. (Read Apple TV vs Chromecast comparison review) Unusually chrome the browser will have no trouble of handling kinds of video types, but not includes ISO files since ISO is not supported by Chromecast. As far as I know it’s not like that you can directly cast iso files to Chromecast for streaming, what you can do is to rip ISO from Blu-ray/DVD to digital movie files like MP4 and use the Chromecast’s local playback workaround to stream the movies to Chromecast. Then how to do it? What tool do we need?

stream iso to chromecast Simple way for copying Blu ray/DVD ISO to Chromecast for streaming


If you’re looking for ease-to-use ripping tool, check out Pavtube BDMagic- a top ISO to Chromecast Ripper, (Here is Top 5 Best Selling Blu-ray Ripper review) which aims to solve this problem by giving us the ability to remove disc protection and convert Blu-ray, DVD and ISO files to Chromecast compatible formats for casting the movies to Chromecast browser with ease in only 3 clicks. In addition, with the Subtitles option, you can freely choose your preferred subtitles for your ISO files.  If you are working on Mac OS X, please get BDMagic for Mac.

How to Transfer Blu-ray/DVD ISO images to TV via Chromecast

STEP 1: Import ISO source

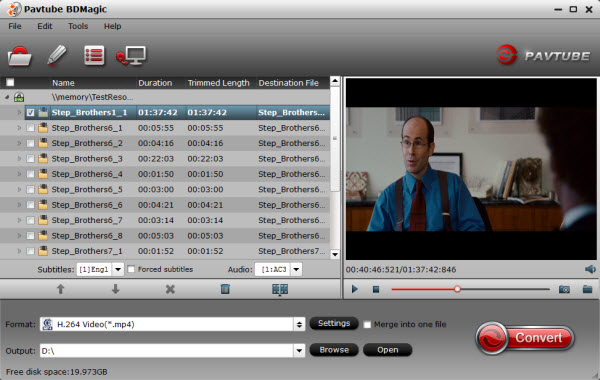
Launch the program Run ISO to Chromecast Ripper, click “Load file” to choose Load IFO/ISO file. It will recognize the ISO image file automatically so that you will not have to run virtual drive to mount the ISO any more.

blu ray to mp4 Simple way for copying Blu ray/DVD ISO to Chromecast for streaming

STEP 2. Choose output format

Click Format bar to get the format list and select a proper export format. For Chromecast, MP4 in “Common Video” column can be compatible. Also learn how to convert ISO files to play on Surface Pro 3Galaxy Tab 4 and 3D TV.

h.264 mp4 format Simple way for copying Blu ray/DVD ISO to Chromecast for streaming

Step 3. Start to rip BD/DVD ISO to Chromecast

When all the settings are OK, click “Convert” button to start converting ISO files to MP4 video. When the conversion is over, click “open” to locate the ripped video files. After the conversion, get the converted mp4 movie for movie casting.

Tutorial: How to Stream Converted iTunes Movies from the Chrome Browser to Your TV

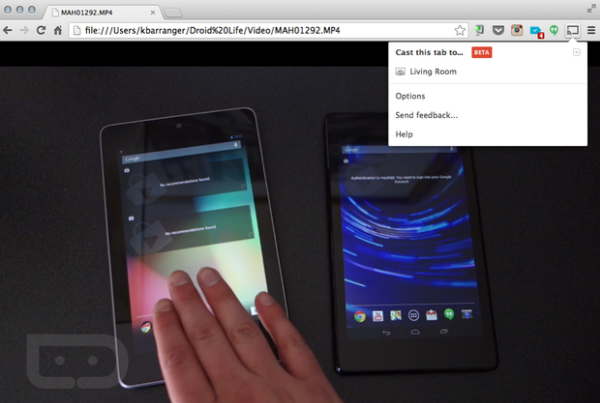
*Download Google Cast extension for your Chrome Browser. The Google Cast extension enables you to find and play content on your Chromecast device from your Chrome browser. Once installed, the Cast Extension is located in the upper right hand corner on the Chrome toolbar.

*Open a new tab in chrome browser and drag the converted iTunes movies or TV shows to the address bar. Chromecast will cast them to your TV. Google Cast supports the following media facilities and types.

drage local movie to chrome browse Simple way for copying Blu ray/DVD ISO to Chromecast for streaming

Note: Both Mac users and Windows users can stream iTunes Movies with Chrome Browser.

IMPORTANT! To do this, you can enter file:///C:/ in Chrome’s address bar (or (file://localhost/Users/yourusername on a Mac), and then drag and drop the file into Chrome—or press Ctrl-O or Command-O—to show your system’s file browser. Hit the Cast button either before or after you choose the file you want.

For Google Cast extension, you can set the quality to High (720p) or Extreme (720p high bitrate) to get a reasonable video quality on a full HD TV.

share medium Simple way for copying Blu ray/DVD ISO to Chromecast for streaming

Competing with Microsoft’s Xbox 360 and Sony’s PlayStation 3, the Wii is also a home video game console released by Nintendo. If you are a Wii enthusiast, then you might be feeling disappointed or left out owing to the fact that you cannot play M4V movies from iTunes Library on your Wii. Yes, Apple only allows you play the iTunes purchased movies on Apple devices or iTunes. The effective way to enjoy iTunes M4V movies on Wii is to remove the DRM from iTunes movies and convert M4V to common video format like MP4, MOV for playing via Wii.

sync itunes to wii Can I watch M4V movies from iTunes Library on my TV via Wii?

What You Need

Pavtube ChewTune is just a best choice for you to remove DRM and convert iTunes M4V to Wii compatible videos. This top iTunes M4V to Wii converter is compatible with Windows XP, Vista, Windows 7, Windows 8 and Windows 8.1, so you can freely install it and try to enable Wii play iTunes M4V movies without DRM limitation. Mac version is here. (Read the reviews) Below are the steps to change iTunes format to Wii with ChewTune, only with a simple clicks, you will finish the conversion from iTunes M4V to Wii acceptable format.

How to remove iTunes DRM and convert iTunes video to Wii

Step 1. Load M4V files to the DRM Removal Tool.

Get this DRM Removal Tool downloaded and installed, drag and drop your iTunes M4V files to it directly.

itunes to wii converter Can I watch M4V movies from iTunes Library on my TV via Wii?

Step 2. Choose output file format for playing via Wii.

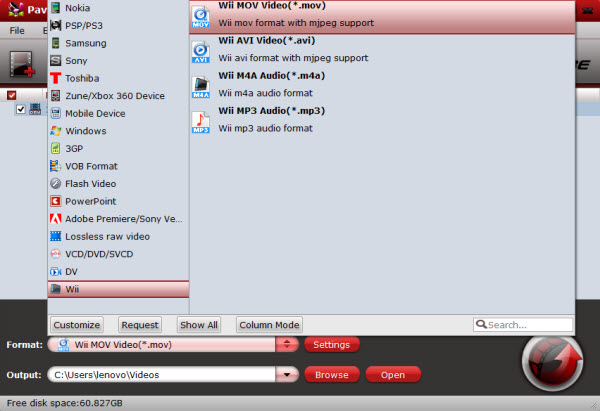
This iTunes m4v to Wii Converter provides optimized presets for Wii. Click the put down menu of “Format”, and then hit “Wii” preset. Wii MOV Video(*.mov), Wii AVI Video(*.avi) are supplied for you to choose.; You can also key in wii in the search box to quick locate this profile. Also you can convert iTunes m4v to play on Nexus 10/9Surface Pro and SD Card.

wii video format Can I watch M4V movies from iTunes Library on my TV via Wii?

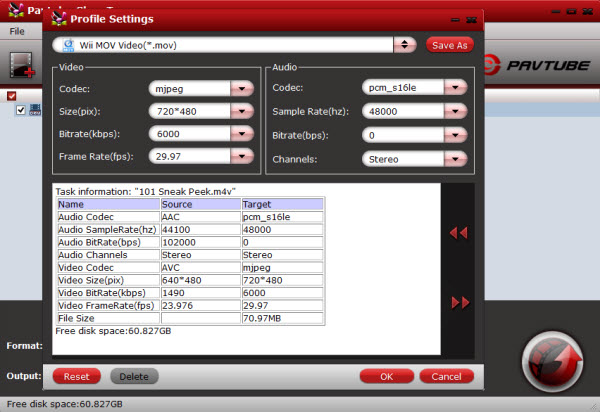
And “Settings” button provides you more customize options like video size, bitrate, frame rate, sample rate(Hz) etc. for output files.

wii video settings Can I watch M4V movies from iTunes Library on my TV via Wii?

Step 3. Strat removing DRM protection from iTunes M4V.

Now you can click “Convert” button to start removeing DRM protection and converting iTunes M4V for playing on Wii smoothly. Wait for moments, then click “Open” to locate the converted video. Now you are ready to add the files to SD card of your Wii for entertainment.

share medium Can I watch M4V movies from iTunes Library on my TV via Wii?

Review: Everything About ‘The Lego Movie”

play blu ray on western digital my book live Move The Lego Movie(2014) Blu ray onto My Book Live for roku streaming with Mac OS X

It would have been so much easier, and so much safer, for directors Phil Lord and Christopher Miller to just make the kind of Lego Movie that you probably expected from the marketing. They could have crafted a simple hero’s journey, crammed with celebrity cameos and postmodern humor, and called it a day while watching the money roll in and the toy sales shoot through the roof.

And there are all of these elements in this particular Lego Movie, but there is also something more. The film goes in some wonderfully unexpected directions and takes real storytelling risks. I cannot say how everyone will respond to its narrative left turns and unexpected poignancy, but they elevate to the film far above a glorified toy commercial. The Lego Movie may in fact be brilliant. Expected release date for The Lego Movie DVD and Blu-ray discs is May-June, 2014.

How to bacup “The Lego Movie(2014)” Blu-ray onto Western Digital My Book Live” on Mac

With “The Lego Movie(2014)” to be released on Blu-ray, I have the question: how to digitize a blu-ray movie and put it on my western digital mybooklive device for streaming onto roku devices with Mac OS X?

To copy my Blu-ray on My Book Live with Mac, it may take a lot of energy. Although, MacX DVD Ripper Pro Wondershare Video Converter Ultimate and iDVD can do this, none of them can be easier to use that Pavtube.

BDMagic for Mac from Pavtube can help you back up Blu-ray and DVD movies to Mac hard drive, copy them to Home Server, NAS for storage and watching them on HDTV and HD Media player including PS3, PSP, Xbox, Dune HD Player, WD TV Live within few clicks. Really simple interface and powerful function. On the roku, I use the roksbox channel, configured to steam movies from the WD/apache server. Works really good on my home network. Windows version is here.

Detailed steps to copy “The Lego Movie(2014)” Blu-ray to My Book Live on Mac

Before copying Blu-ray discs check what you need:

1. An external Blu-ray drive.

2. Top Mac Blu-ray Ripper software – Pavtube BDMagic for Mac

3. Internet connection.

4. “The Lego Movie(2014)” Blu-ray disc.

You can also free download Pavtube Blu-ray Ripper for Mac and have a try.

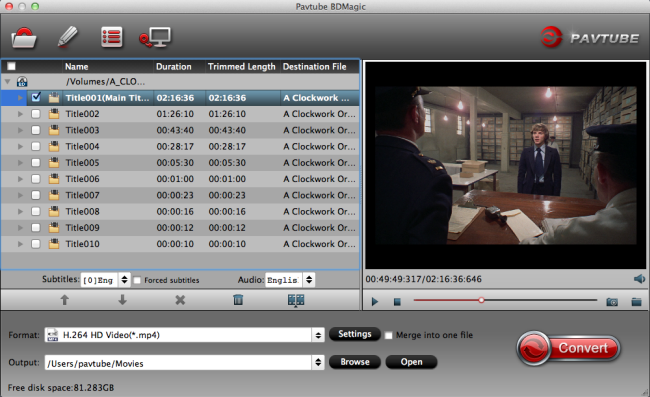
Step 1. Install and run the Top Blu-ray Ripper for Mac and insert Blu-ray disc into the Blu-ray drive, the Ripper will automatically load the disc information.

Make sure you have enough space on your drive (depending on the disc, this could be up to 50 GB).

pavtube bdmagic for mac Move The Lego Movie(2014) Blu ray onto My Book Live for roku streaming with Mac OS X

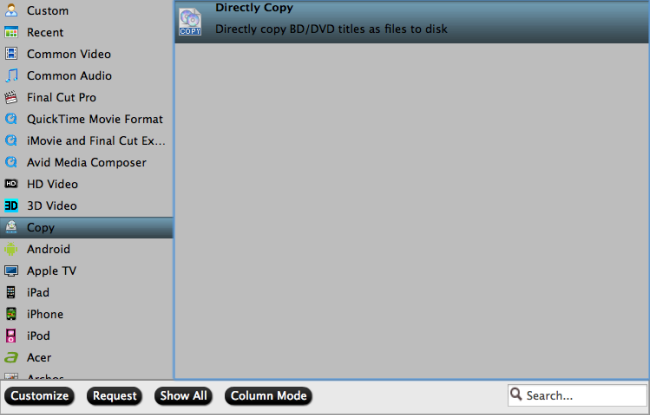
Step 2. To copy the M2TS/ VOB streams only without menus and ads, pls choose the “Directly copy” option in “Copy”. (The main movie is selected by default.)

directly copy Move The Lego Movie(2014) Blu ray onto My Book Live for roku streaming with Mac OS X

Or you can click on “Copy the entire disc” button to back up Blu-ray movie to Mac. A 90 min. Blu-ray takes about 40 min to copy to Mac hard drive. The ripped Blu-ray directory contains two folders, “BDMV” and “CERTIFICATE”. Then the ruku is able to play the M2TS files from Blu-ray directory.

copy entire disc mac Move The Lego Movie(2014) Blu ray onto My Book Live for roku streaming with Mac OS X

Step 3. Specify an output folder to save Blu-ray movie.

Click “Browse” button and specify an output location. Make sure there is enough space for a whole BD movie (usually 25GB-50GB) when backing up Blu-ray disc to Mac HDD.

Step 3. Back up Blu-ray/DVD for My Book Live on Mac.

After the copying process completes, you can get the final output files by clicking “Open” button with ease, then copy resulting file to My Book Live and then stream onto your Roku.

Additional Tips

The Top Blu-ray Ripper for Mac can help you remove Blu-ray protection and rip “The Lego Movie(2014)” Blu-ray to common formats: MP4, AVI, MOV, MKV, WMV, SWF, FLV, F4V, etc. Most popular portable devices are also supported, so that you can enjoy Blu-ray movies on your iPhone 6, iPhone 6 Plus, iPad 3/4, iPad Mini 3, iPad Air 2, Surface Pro 3, Galaxy Note 4, Google Nexus 7, Kindle Fire HDX… Moreover, Pavtube programs support adding *.srt and *.ass subtitles into video.

Related Articles:
share medium Move The Lego Movie(2014) Blu ray onto My Book Live for roku streaming with Mac OS X

“I have a collections of disney DVDs like frozen, gravity, once upon a time, the legacy(danish serie), etc. and I need a software to get a save backup of my disney on my mac. However, I tried some software like the popular handbrake, but the results are all not so satisfied. It doesn’t always work! Could anyone can give me suggestions?” (For beginners: Read brief Introduction of DVD)

rip dvd on mac Use Handbrake alternative to Copy Disney DVD to Mac with No Error

Do you have met the same problem with this customer? Using Handbrake to Copy Disney DVD to Mac but end up with failure? HandBrake is an open-source and multiplatform video transcoder, available for Mac OS X, Linux and Windows. But it not always functions with DVD conversion. For exmaple, one the one hand, it can’t deal with protected Disney DVD discs. On the other hand, speaking with converting DVD on OS X 10.9 Mavericks and OS X 10.10 Yosemite, the latest version of Handbrake hasn’t added support. Worse still, HandBrake exports .mp4, .m4v and .mkv format only and some iPad/iPhone video which can’t meet users’ need for more multiple end use.

Find a Handbrake Alternative to Solve DVD Conversion Errors

As a matter of fact, Handbrake errors can be quite difficult to overcome. This needs you a lot of professional knowledge to get it through. Luckily, here is another decent approach is available- using Handbrake alternative- Pavtube BDMagic for Mac to makes every backing up and conversion a simple task, without any problem.

Thanks to its fast speed, no brainer and 100% quality reservation, this Mac Blu-ray Ripper is highly recommended to works with 1:1 backup solution and convert Blu-ray/DVD to MKV/MP4/MOV/M4V/MPG/FLV/AVI/WMV, etc. Well I haven’t got the chance to try every profile, but it’s really the best Blu-ray/DVD backup tool I’ve met ever; I mean it’s ease of use, not fuss and simple to follow. This best Blu-ray Ripper can rolls off Blu-ray/DVD disc protection, supports loseless 1:1 Blu-ray/DVD backup and keeps all the disc titles and chapter structure perfectly. Below we take the example how to using the alternative to Handbrake to copy Disney DVD to Mac (OS X 10.9 and 10.10 are both supported)

How to backup Disney DVD to Mac with No Error

Step 1. Run Best Mac Blu-ray Ripper and import disc.

Click this icon to load Disney DVD disc from ROM, IFO/ISO or folder. I also noticed if you have a ISO file to import, it will recognize the ISO file automatically with no need to run virtual driver and mount ISO files firstly.

pavtube bdmagic for mac Use Handbrake alternative to Copy Disney DVD to Mac with No Error

Step 2. Choose format.

Click “Format” drop-down list and choose proper format for different using. Here I choose MP4 which is best for playback, sharing and storage.

For instance, if you simply want to back up Disney DVD to external hard drive, here are two solutions:

1. Click the “Computer” icon on the top to output 1:1 DVD file exactly the same as original.

copy entire disc mac Use Handbrake alternative to Copy Disney DVD to Mac with No Error

2. Select “Copy > Directly Copy” in format list to output an intact vob file of the main title.

directly copy Use Handbrake alternative to Copy Disney DVD to Mac with No Error

Step 3. Change video specs. (Optional)

If you are not satisfied with default specs, then click “Settings” to enter Profiles Settings windows. You can customize video frame rate, bitrate, size and other settings freely. (It does not work for directly copy)

Step 4. Start conversion.

Click the big red “Convert” to start backing up or converting your Blu-ray/DVDs. Usually backup will be quicker because it does not need to do trancoding.

After the conversion, click “Open output folder” to quick locate converted files. Connect your hard drive to Mac computer and transfer them into it for enjoying. Now your “No work to Copy Disney DVD with Handbrake on Mac?” problem has been successfully resolved.

What’s more, you can also backup Blu-ray on Windows 8.1media streamer and  iTunes library on Mac mini.

share medium Use Handbrake alternative to Copy Disney DVD to Mac with No Error

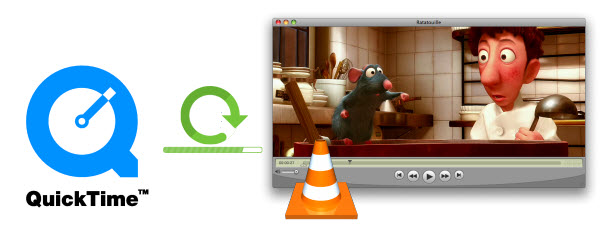
MOV is a QuickTime multimedia file format, which can only be played on some special media players, like Apple QuickTime, VLC, etc, but has limitations to play in Windows Media Player.

convert quicktime mov to wmv How to Convert QuickTime (MOV) to Windows Media Player
Here is a question from a forum:

Hey I have a video thats Quicktime file, but am trying to find a way to make it so it plays with Windows media player. I have Hp pavilion with Windows XP. If anyone can help i would appreciate it.

In fact, Windows Media Player can’t play most Quicktime files. The few it can play use cross-platform codecs like Indeo or Cinepak, or are uncompressed. What you have to do is to install a Quicktime Alternative or find video converter to a convert MOV files to Windows Media Player formats, like WMV, AVI, MPEG, etc.

  • To get a QuickTime alternative, you can read this article to get Top 5 Great and Free QuickTime Alternative to Play Any Video Flawlessly.
  • If you still have problems with your QuickTime alternative and prefer a stable and easier way, it will make you resort to solution 2.

To share your QuickTime (MOV) video via e-mail or the web, the small, yet high-quality Windows Media Format (WMV) is your best choice. It plays in Windows Media Player, which comes standard on all Windows PCs. And the videos in this format can easily be edited with video editing software.

In order to convert your QuickTime MOV to Windows Media Player supported format on Mac quickly and easily, Pavtube Video Converter for Mac is a professional yet easy-to-use Video Converter. It features a simple yet sleek interface and performs files conversion with fast speed enables you to complete the task in just a few clicks at your fingertips. It’s built-in editor can also fulfil your needs to create personalized video visual effects. Here we begin.

The following guide will show you how to convert QuickTime mov files to HD WMV for playing on Windows Media Player. Download it and follow below steps.

More solution are here:

Step 1. Load QuickTime mov video files.

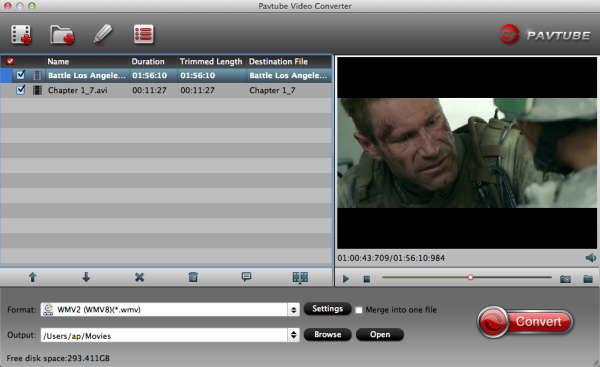
You can choose “add video” directly or “load files” to add the whole folder.

quicktime mov to wmv converter How to Convert QuickTime (MOV) to Windows Media Player

Step 2. Select output format for Windows Media Player.

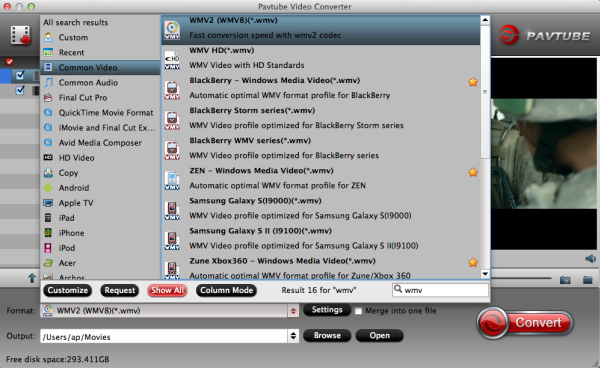
Click “Format” menu you will find various video formats listed by different devices. Just choose a compatible video format for Windows Media Player. You can choose “Common Video” > “WMV 2 (WMV8)(*.wmv)” as the output format, or select “HD Video” and choose “WMV HD(*.wmv)” as the output format.

windows media player wmv format How to Convert QuickTime (MOV) to Windows Media Player

Step 3. Edit loaded QuickTime video files.

Click “Edit” button and you are allowed to trim, crop, add text/image/video watermark or some effect to your output video for making it perfect. Here the function of adding subtitles to output files will contribute to make your own videos. You can use free software Subtitle Edit to edit your subtitle content then add it to output videos.

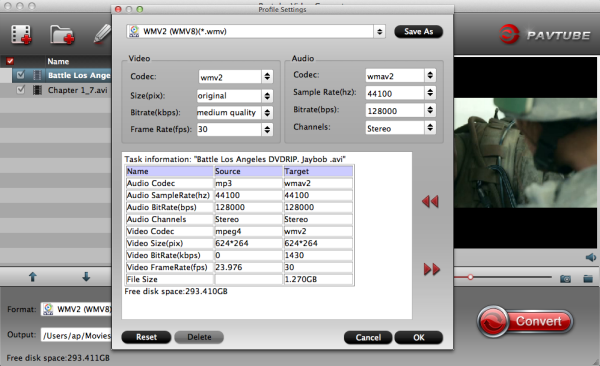
Tips: Click “Settings” on the interface and you can adjust the parameters including size, bitrate, frame rate, etc. to get a high quality of output files. And keep the settings the same as original video recordings will provide you the least loss of video quality.

wmv format settings How to Convert QuickTime (MOV) to Windows Media Player

Step 4. Start conversion.

Click the “Convert” button to start conversion. When it completed, click the “Open” button to get the generated videos for Windows Media Player.

When the conversion finishes, you can click “Open” button to get the final output files. Open Windows Media Player and then add items to the Windows Media Player Library for playback.

Pavtube Video Converter for Mac is compatible with Mac operating system (Mavericks 10.9 included), supports convert all popular video/audio format from one to the other and it will meet almost all your requirements about converting videos.

share medium How to Convert QuickTime (MOV) to Windows Media Player

An MOV file is a QuickTime media container format. That is, it can store audio and video data. In this article we will talk about three possible ways to finish the simple task of playing back MOV files on a Mac/Win computer.

quicktime mov player Best MOV Player  Three methods to play QuickTime mov files on Mac/Win

Plan A: Use QuickTime MOV Player

QuickTime is a multimedia framework developed by Apple Computer Inc. The QuickTime player is available for both the Mac and Windows operating systems. For mac users, it is a built-in player(Learn how to  install QuickTime 7 Pro For OS X Yosemite), and for windows users, they prefer the buitl-in Windows Media Player. However, the WMP doesn’t support the MOV file format unless they’ve updated their computer system to Windows 7. If you want to get QuickTime windows version, click here.

Plan B: Use VLC Media Player

VLC is the most popular open source media player on the internet. It plays broken files, incomplete files and virtually every file format out there, including MOV files. There’s no reason not to use VLC.You can download it from the VLC site.

Plan C: Convert QuickTime MOV to Playable Formats in Mac/Windows

It should be noted that sometimes, despite all the efforts, analysis and trial & error with the player you’ve applied in order to get a mov video to play, it just wont. Then the third plan comes- converting the MOV file with Pavtube Video Converter for Mac is the best choice to resolve all MOV file’s incompatibility issues so that users can watch QuickTime MOV videos anywhere without any hassle.

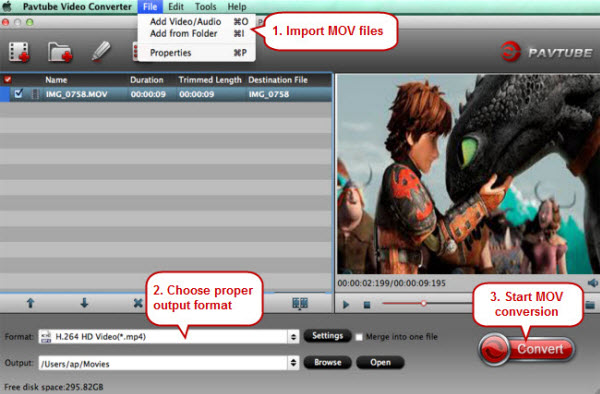
Step 1. Run the best QuickTime mov file Converter, click “Add Video” or “Add from folder” and load the mov files.

quicktime mov video converter Best MOV Player  Three methods to play QuickTime mov files on Mac/Win

Step 2. Clicking the “Format” menu, here you are suggested to choose “HDVideo > H.264 HD Video(*.mp4)”. You can also choose “Xvid AVI – Audio Video Interleaved(Xvid)(*.avi)” for playback on Mac/Win.

Step 3. If you like, modify profile settings such as video size, bitrate, frame rate, etc to get optimized video and audio playback.

Step 4. Return back to Video Converter for Mac main interface, and hit the “Convert” button to start encoding QuickTime mov to AVI/MP4 format. Once it finishes, open output folder, locate the created file and you can add to your media players for watching.

Tip: If you have other files like MKV, WMV, MP4, AVI, FLV, etc. that’s also unsupported and would like to play them on your MOV player, you can also convert them into mov fils.

share medium Best MOV Player  Three methods to play QuickTime mov files on Mac/Win

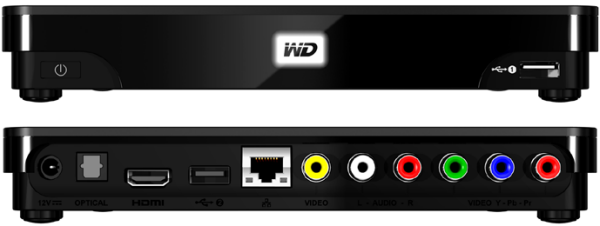
WD TV is a good HD media player, and WD TV Live Hub supports a wide variety of the most popular video formats. You can play Internet and personal media on HDTV via WD TV Media Players. But can WD TV Live play MKV?

wdtv live hub Streaming .mkv files from Windows 8.1 PC to WD TV Live Hub via DLNA

Hi I have a similar problem. I have been able to play a mkv file yesterday and today I can not play a second film which is also mkv. Then it begins to load and freezes there. Should I download a program and convert all my mkv files now so I can play them with my wd live television box? I do not hope this is the solution to my problem…

In fact, playing MKV file from local HDD on Windows 8.1 PC is never a problem for WD TV Live Hub. The problem is MKV streaming over the Internet. Basically, with DLNA media devices, there are certificates given to each product that receives DLNA approval. The problem is that .mkv is not one of the media options that are categorized because it’s not a sanctioned format (not like WMV, MPEG, etc.) Besides, MKV is a flexible container format which can store just about anything (H.264, DivX, MPEG, any sort of audio, even menus and subtitles) while WMV, MPEG is more or less complete formats so they know what to expect while with MKV’s you really can’t tell without checking the contents itself.

Although most people meet with very limited success streaming .mkv files from NAS to a DLNA-certified HDTV, it is reported that many have good luck when streaming H.264 .mkv with AC3 audio. DTS audio in .mkv may results in av sync problems so it is advised to be converted to AC3 or AAC before streaming MKV.

Anyway, the best way solving this problem is streaming .mkv from Windows 8.1 PC while transcoding the file on the fly with media server like Tversity. Despite that, you may receive error message when streaming .mkv to WD TV Live Hub. In that case you’re suggested to convert .mkv to DLNA sanctioned format, e.g. H.264 .mp4. The following guide tells you how to convert .mkv to H.264 .mp4 video with AAC audio included for streaming to WD TV Live Hub.

share medium Streaming .mkv files from Windows 8.1 PC to WD TV Live Hub via DLNA