Welcome to Delicate template
Header
Just another WordPress site
Header

 This guide mainly walk through the way to sync videos, music, photos from Mac to iPad Air. Simply follow this instruction to transfer media files to iPad Air in several steps!

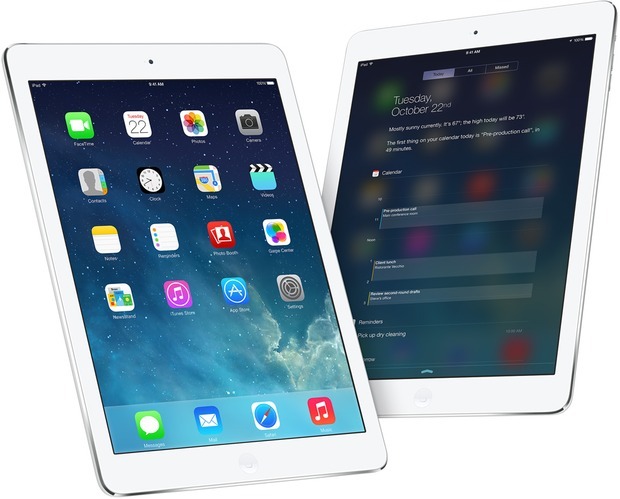
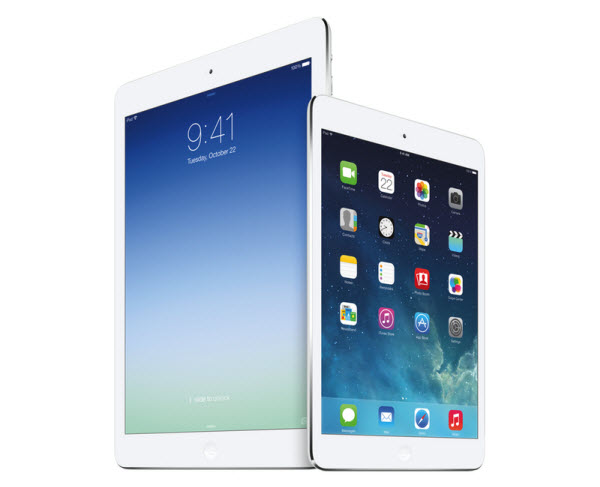
iPad created an entirely new mobile computing experience, and the new iPad Air is another big leap ahead. It is so thin, light and powerful, once you hold one in your hand you will understand what a tremendous advancement this is. It is Apple’s new full-size iPad that replaces the old 4th generation iPad. Want to sync your iPad Air with iTunes on your computer? Read the guide below to learn how to transfer media files from Mac to iPad Air with ease.
apple ipad air Transfer media files from Mac to iPad Air

At first, let’s see some advantages for syncing your iPad Air with a computer. 

1. Each day you sync your iPad Air, iTunes stores a backup of its content. You can restore all your data from these backups if you lose your iPad Air.

2. Syncing with a computer is the only way to get a large number of videos, music, photos from your collection on your iPad Air.
3. Note if you have a large collection of videos, music, photos, you can opt to copy only a selection of it to your iPad Air at any one time.

Tips you should now before transferring:

1. I you are on a Mac, you already have iTunes. All you need to do is run Software Update to make sure you have the latest version.

2. You might get a message on your Mac computer the first time you connect your iPad Air and open iTunes, asking if it is okay to sync your iPad Air to this computer. The message won’t reappear.

3. After connecting the first time, iTunes should automatically open when you connect your iPad Air. While connected, you can always resync to apply changes by clicking the Sync button in iTunes.

4. You can also check Sync over Wi-Fi connection in your iPad Air’s options in iTunes. This allows you to sync when your iPad Air isn’t connected by the cable. It only needs to be on the same network as your Mac that is running iTunes.

5. After your device is in sync, you can change some general options for your iPad Air from the Summary screen in iTunes. Most of the options are self-explanatory, such as Open iTunes When this iPad Is Connected.

6. One option that dramatically changes how your iPad Air syncs is Manually Manage Music and Videos, which turns off automatic syncing of music and videos and enables you to simply drag and drop songs and movies from your iTunes library onto the iPad Air icon on the left. (You might need to scroll down the Summary page to locate this checkbox if your screen size is too small to show the entire page at once.)

7. As we look at some of the syncing options for the iPad Air, the Mac version of iTunes is used as an example. The Windows version of iTunes is similar but not exactly the same. One difference is that on a Mac, iTunes syncs data with Mac applications such as Address Book, iCal, and iPhoto. On Windows, iTunes must find this data elsewhere.

How To Sync videos, music, photos from Mac to iPad Air

  • I. Syncing without wifi

1. Launch iTunes 11 from your Mac.
itunes mac Transfer media files from Mac to iPad Air

2. Plug in your device if you haven’t already.

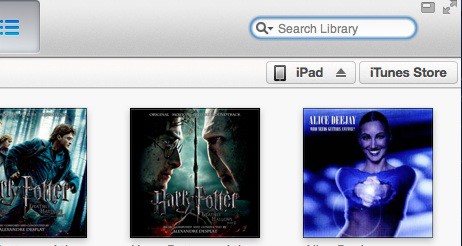
3. In the upper right hand corner you will see your iPad Air appear. Click on the name of your device.
 Transfer media files from Mac to iPad Air

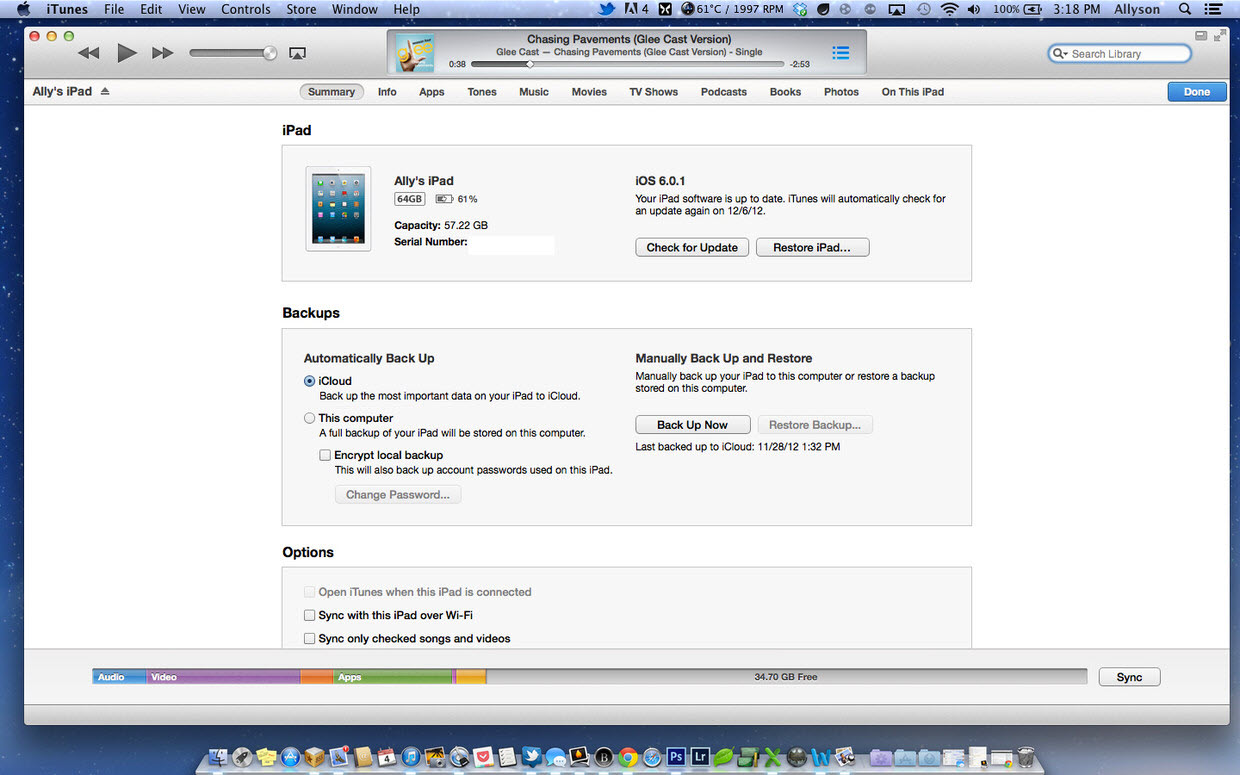
4. You will be taken to the summary screen. From here you can see a list of tabs along the top.
itunes 2 Transfer media files from Mac to iPad Air

5. Click on the tab for the type of media you’d like to sync to your iPad Air. You can choose from tones, music, movies, tv shows, podcasts, books, and photos.

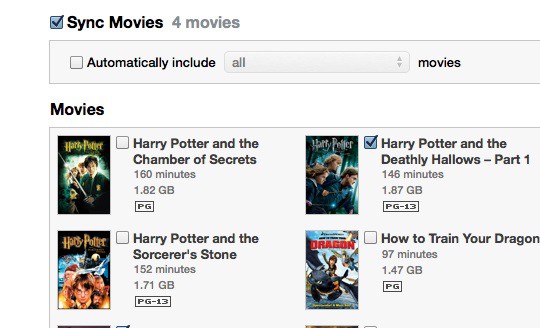
6. Make sure the checkbox for the media type is checked and where applicable, select the media items you’d like to sync.
itunes 6 Transfer media files from Mac to iPad Air

7. Click the Apply button in the lower right hand corner after you’re done selecting all your media.
itunes 4 Transfer media files from Mac to iPad Air

8. Wait for iTunes to finish syncing your content before unplugging.

As with apps, to remove content such as a movie, book, or podcast, simply uncheck it. For music, you can even choose only specific playlists or songs.

  • II. Syncing over Wi-Fi 

If you have a strange aversion to cables and they make you cringe when you think about having to plug in to sync, iTunes also offers Wi-Fi sync which allows you to sync your device wirelessly.

1. Enable Wi-Fi sync

2. Launch iTunes 11 from your Mac.

3. Plug in your device if you haven’t already.

4.In the upper right hand corner you will see your iPad Air appear. Click on the name of your device.

5. You will be taken to the summary screen.

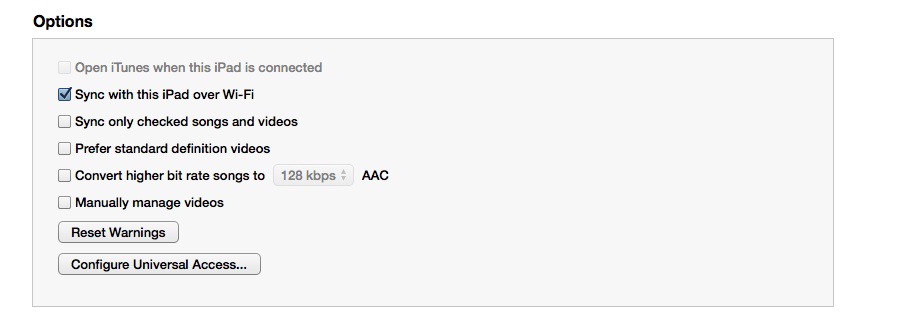
Under the Options section, turn On the option to sync your device over Wi-Fi by checking the box.
 Transfer media files from Mac to iPad Air

Click on the Apply button in the lower right hand corner to save your changes.

itunes 4 Transfer media files from Mac to iPad Air

You’ll now be able to apply changes to your iPad Air over Wi-Fi as long as you’re sharing the same Wi-Fi connection as your iPhone, iPad, or iPod touch.

Other options for iPad Air media transfer

1. Use a USB flash drive & the camera connection kit
Plug the USB flash drive with an SD card into your computer and create a new folder titled DCIM. Then put your movie/photo files into the folder. Now plug the flash drive into the iPad using the iPad Camera Connection Kit. Open the Photos app, the movie/photo files should appear and you can import media to your iPad Air.

NOTE: The files must have a filename with exactly 8 characters long (no spaces) plus the file extension (i.e., my-movie.mp4; DSCN0164.jpg). And when using certain digital cameras or SD cards, you may be unable to delete images from the device. In these situations, the Delete option will not appear.

2. Transfer media to iPad Air wirelessly via iCloud
iCould is a wireless service to help iOS users to transfer documents, music, videos, etc between iOS devices and PC/Mac. With iCloud, you can watch movies, read books, and listen to music anywhere you are.Tips for synchronizing unsupported videos/movies to iPad Air

1. If you want to copy videos to iPad Air in other formats like MKV, WMV, AVI, FLV, MTS, M2TS, MOV, MPEG, MPG, MOD, TiVo, VOB, etc, you will need reformat these video files first. You can try this professional iPad Air Video Converter  (20% off) to batch convert videos in various formats up to 1080p to iPad Air playable format (e.g. MP4).

2.If you have the intention to transfer Blu-ray, DVD movies as well as your personal HD video files to iPad Air, you’d better get the best all-in-one video convert tool Video Converter Ultimate (20% off) to have fastest and most effective conversion.

Related articles:

Rip/Stream Blu-ray movies to Apple iPad Air
Transfer and Play DVD movies on iPad Air with Decent Quality
How to play 1080P/720P HD Videos and Movies on iPad Air

share medium Transfer media files from Mac to iPad Air

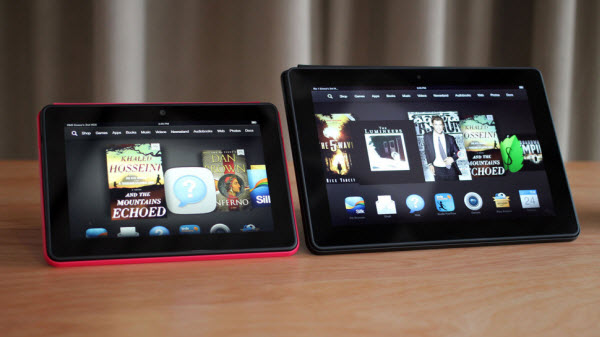
This guide is written for future Kindle Fire HDX owners who feel like downloading their movie library including DVD/Blu-ray movies and various formats of 1080p videos to Kindle Fire HDX 7/8.9 for playback on the go with Fire HDX Ultimate Video Converter.

kindle fire hdx Put and Play 1080p/720p Videos, Blu ray and DVD Movies on Kindle Fire HDX

The star of Amazon’s newly refreshed line of tablets is the Kindle Fire HDX, and it appears to be a faster, sexier, and smoother experience on all fronts. Available in 7-inch and 8.9-inch versions, the HDX ($229-$579) certainly appears prettier in its revamped molded magnesium body, with its buttons in better places, and oh yeah, sharper screens (the 8.9-incher owns a 2,560×1,600-pixel-resolution screen). Throw in its battery life and obvious portability, the Kindle Fire HDX can be used as a great media player for watching movies.

If you have some Blu-ray/DVD collections or the 1080p/720p videos you’ve downloaded from websites which are not in the supported video format of Kindle Fire HDX, you’ll need to convert them to Fire HDX compatible video format first and then sync converted movies to the Kindle Fire HDX for playback. The article below will help you better enjoy your 1080p/720p HD video and DVD, Blu-ray movies with your Kindle Fire HDX. Just follow it.

First, Free Download the App – Pavtube Video Converter Ultimate (20% off)

The program can help you compress 1080p Blu-ray to Kindle Fire HDX, rip DVD movie to Kindle Fire HDX and convert HD videos to Kindle Fire HDX, including MKV, AVI, MPG, VOB, TiVo and more, everything can be transferred to Kindle Fire HDX optimized formats at ease. Meanwhile the playback of the converted videos is as decent as possible as original and the conversions can be made for use on all forms of the Kindle Fire HDX. If you are a Mac user, you can use its equivalent Mac version -iMedia Converter Mac (Also 20% off now) to achieve your goal smoothly.

Ripping Blu-ray/DVD, Convert 1080p/720p HD videos for play on Kindle Fire HDX

The quick start guide below uses the movie converter Windows(Windows 8 included) screenshots. The way to converting movies to Kindle Fire HDX on Mac (Mac Mavericks 10.9 included) is almost the same. Just make sure you get the right version according to your computer operating system.

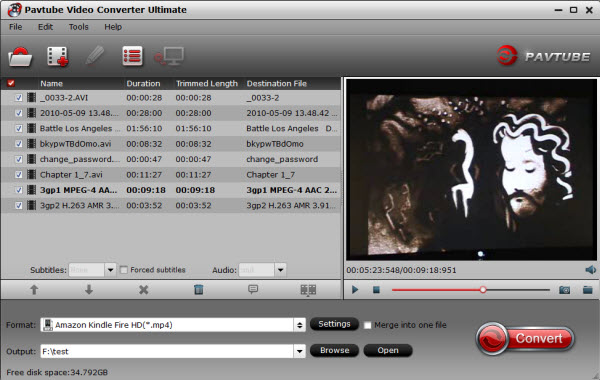
Step 1: Import souce video files to the program

Once run the Ulitmate Movie Converter for Kindle Fire HDX software, click “Add Video” to load video files like MTS/M2TS, MKV, VOB, MOV, TOD, TiVo, etc or click on “BD/DVD disc” icon to load movie from DVD and Blu-ray source(Disc, folder, ISO).

fire hdx video converter Put and Play 1080p/720p Videos, Blu ray and DVD Movies on Kindle Fire HDX

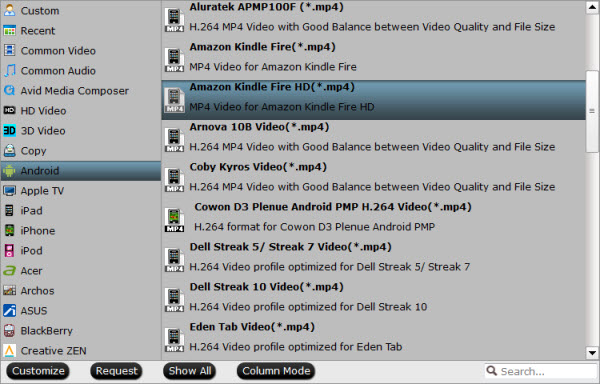
Step 2: Select the suitable output video format

Select the suitable output video format. Click “Format” bar, you can easily find the optimized videos for Kindle Fire HDX under “Android > Amazon Kindle Fire HD(*.mp4)”. The preset is specially designed for Playbook but the output videos could fit on Kindle Fire HDX perfectly and supplies full-screen playback.

kindle fire hdx video format Put and Play 1080p/720p Videos, Blu ray and DVD Movies on Kindle Fire HDX

Click “Settings” to change the video encoder, resolution, frame rate, etc. as you wish. Keep in mind that bitrate higher results in big file size, and lower visible quality loss, and vice versa. For watching movies on Kindle Fire HDX, 720p with 1500~2500kbps is just all right.

Step 3: Start encoding movies to Kindle Fire HDX MP4 videos

After above steps, just click “Convert” to begin ripping Blu-ray/DVD and converting 1080p/720p videos to Kindle Fire HDX highly compatible MP4 videos.

When the ripping task is completed, you can click “Open” to find the ripped videos. After that, connect your device to computer via USB and transfer the videos to it with ease. So there you have it. Pretty simple. Now, you can enjoy viewing movies DVD, Blu-ray and various formats of MKV, AVI, VOB, WMV, MTS HD videos on Kindle Fire HDX anytime everywhere for great digital fun.

More Topics:

Convert and Play DVD on Kindle Fire HDX 7/8.9
Watch Blu-ray movie on Kindle Fire HDX 8.9

share medium Put and Play 1080p/720p Videos, Blu ray and DVD Movies on Kindle Fire HDX

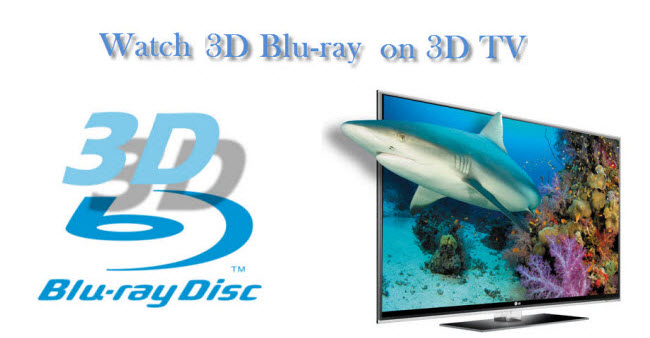
Playing 3D Blu-ray on Samsung 3D LED smart TV is possible. Since 3D Blu-ray is back-ward compatible with 3D TV, now with a 3D Blu-ray Ripper and 3D glasses, you can enjoy 3D Blu-ray with Samsung 3D LED smart TV freely.

Theoretically, to enjoy 3D movies at home you need 3D HDTV, 3D Blu-ray player and 3D glasses. But in reality only a few guys would spend like thousands $ on an expensive 3D HDTV like Samsung 3D LED smart TV just for 3D Blu-ray experience.  So the concerning here is, can we use Samsung 3D LED smart TV to play 3D Blu-rays with keeping 3D effect? The answer is YES.

watch 3d blu ray on 3dtv Can I play 3D Blu Rays on Samsung 3D LED smart TV with keeping 3D effect?

At first, you need to get the 3D Blu-ray Disc ripped into 3D compatible MP4/MKV videos so as to play 3D Blu-ray on Samsung 3D LED smart TV.

I recently purchased Blu Ray Ripping software  from Pavtube and very pleased with its functionalities, since I am new in this game and trying to build my HTC I have one. I have Avatar blu Ray and Blu Ray 3D bundle , I have already ripped the non 3D version and it just works fine, however I would like to know what setting I should be using to rip the 3D version of the movie so my Samsung 3D LED smart TV ( Active 3D glasses) will play show the 3D content without problem. (I may alsi add I use the Direct Copy for ripping the Blue Ray’s so I get the best quality possible on my PC).

Highly recommended to give a shot!

Tips:

1. Mac Blu-ray to 3D Converter for Mac users;

2. 3D effect on converted video is added by program; it may not be exactly the same as your original 3D blu-ray disc.

Tutorials: Rip 2D/3D Blu-ray to 3D MKV/MP4 in Anaglyph, T/P and SBS for watching on Samsung 3D LED smart TV

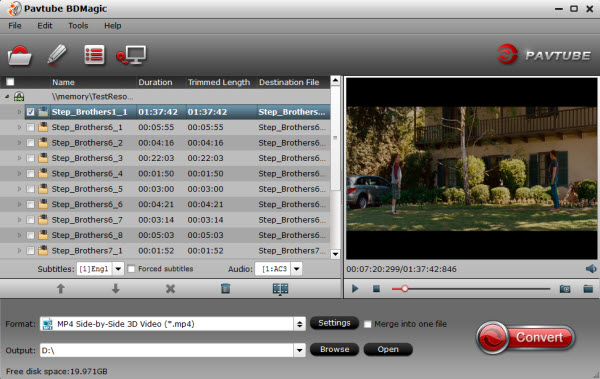
Step 1. Run Pavtube BDMagic as the best 3D Blu-ray Ripper; load disc.

Click “Load files” to load blu-ray movie from ROM, blu-ray folder or import Blu-ray ISO file directly. There’s not need to run virtual drive to mount the ISO files; Pavtube BDMagic will recognize them automatically.

blu ray to sbs mp4 Can I play 3D Blu Rays on Samsung 3D LED smart TV with keeping 3D effect?

Step 2. Choose format.

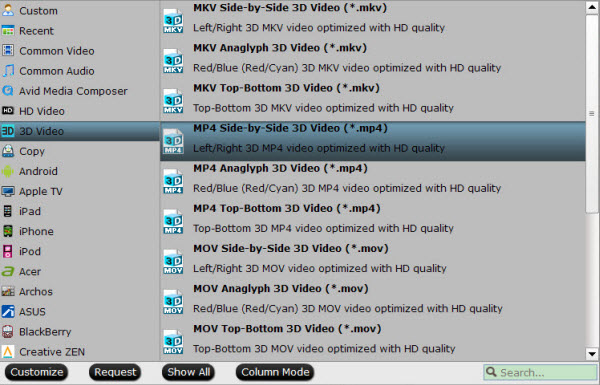
Click the “Format” bar and find “3D Video”, you will find several presets for MKV/MP4 in Side-by-Side 3D, Top-Bottom 3D and Anaglyph 3D. Usually MKV and MP4 are most recommended formats, but you still need to check your device specification to choose one accordingly.

mp4 side by side 3d video Can I play 3D Blu Rays on Samsung 3D LED smart TV with keeping 3D effect?

Step 3. Adjust 3D effect.

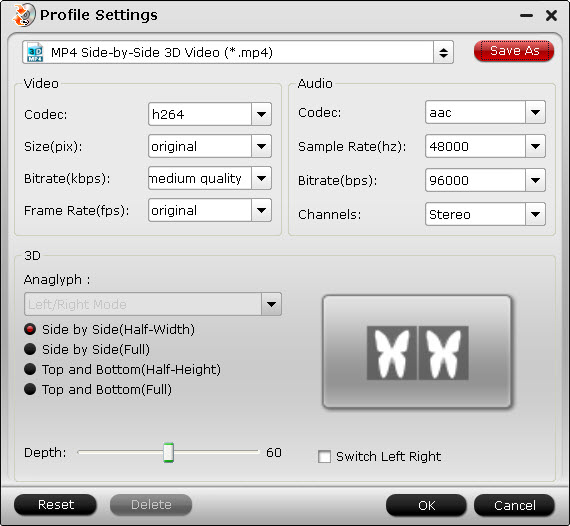
Click “Settings” to enter customize specs window; you can adjust resolution(size), bitrate, frame rate, 3D mode and depth here.

Tip 1: When you have trouble getting aligned images in saved 3D MKV/MP4 video, adjust “Depth” in Profile Settings helps make the film images aligned perfectly.

Step 4. Start Conversion.

Hit the “Convert” button to copy your 3D Blu-ray movie to 3D MKV/MP4 video. When if finishes, click the “Open” option to locate the created 3D video and you are ready to transfer your 3D Blu-ray movies to Samsung 3D LED smart TV for entertainment.

Tip 2: It is much complicated for encoding Blu-ray to 3D video because of data analyzing and processing, so the process of copying 3D video takes more than regular disc ripping.

Read more:

Convert 3D Blu ray discs to a Side-by-side MKV to stream to projector via WDTV
How to Enjoy 2D Blu-ray movies on 3D Device to get comfortable 3D entertainment
Copy Jack the Giant Slayer 3D Blu-ray Disc to Hard Drive for enjoying

share medium Can I play 3D Blu Rays on Samsung 3D LED smart TV with keeping 3D effect?

This article is mainly talking about how to backup DVD ISO/IFO movies onto Galaxy Tab 3 10.1. Help you watch DVD ISO/IFO images on Galaxy Tab 3 10.1 freely.

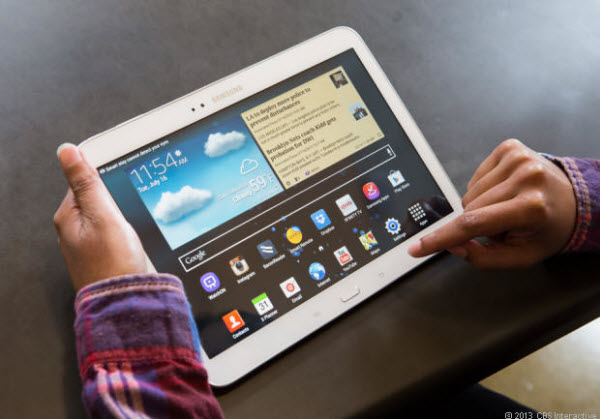
The Samsung Galaxy Tab 3 10.1 features a lightweight and compact design for a 10-inch tablet. Its screen is impressively bright, and a 64GB storage expansion option is always an appreciated extra. For those interested in the largest variant, the one with the 10.1-inch display is what to expect. With the new Samsung Galaxy Tab 3 10. 1 on hand, do you want to put your DVD ISO/IFO files from the Internet or your friends to Galaxy Tab 3 10. 1 for watching?  However, The DVD ISO/IFO image file is not supported by Galaxy Tab 3 10. 1.

Samsung Galaxy Tab 3 10.1 Copy/Transfer DVD ISO/IFO to Galaxy Tab 3 10.1

What is DVD ISO/IFO?

A DVD ISO/IFO file is also known as a disc image file. It is an archive file of an optical disc in a format defined by the International Organization for Standardization (ISO). A valid ISO image is an uncompressed collection of various files with one single file as a result. With one file only, it is simple to transfer over the Internet or via a LAN connection. Windows applications like ImgBurn can help you create DVD ISO from unprotected DVD discs.

In order to put DVD ISO/IFO files on Galaxy Tab 3 10.1 for playing. We need a ISO/IFO to Galaxy Converter to convert/rip DVD ISO/IFO to Galaxy Tab 3 10.1 playable video formats. The following is how to make it.

At first, we recommend you Pavtube DVDAid, this software is powerful in ripping DVD including commercial DVD with protections like BD+, region code. What’s more, you do not need to worry about the ripping and converting speed. It is excellent for it and it supports CUDA acceleration technology, which will provide you 6 x faster speeds. Apart from it, it will provide the high quality output files for Galaxy Tab 3 10.1 and many other videos formats.

Go to get it to convert DVD ISO/IFO to Galaxy Tab 3 10.1 supported MP4 format and freely enjoy your favorite DVD ISO/IFO files on Galaxy Tab 3 10.1. If you are a Mac user, please turn to Pavtube DVDAid for Mac.

  • Good News! Both the two programs are 30% off

Note: If you still have a variety of Blu-ray movies waiting for transferring to Galaxy Tab 3 10.1  for playback, you’d better turn to Pavtube BDMagic and BDMagic for Mac ( Both are also 30% off now). It can rip and convert both DVD and blu-ray disc.

How to convert DVD ISO/IFO files to Galaxy Tab 3 10.1?

Firstly get your DVD ISO/IFO in your DVD drive and then launch the software to get things ready.

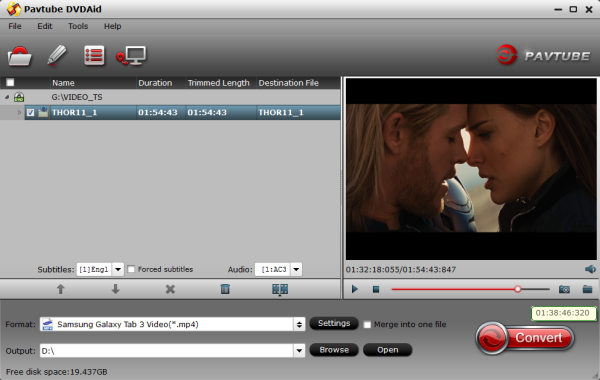
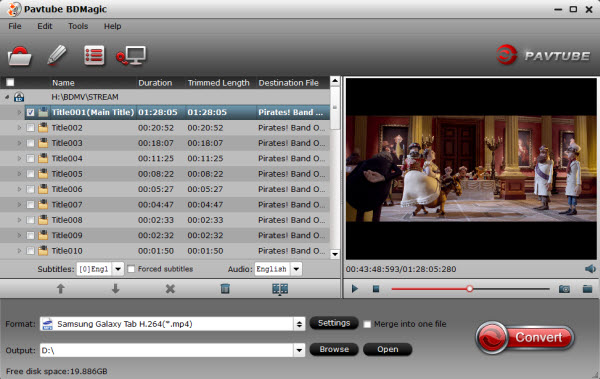
1. Load DVD  ISO/IFO image file to Pavtube DVD ISO/IFO to Galaxy Tab 3 Ripper.

Click “Load ISO/IFO” or “Load from folder”. It will only take few seconds for ripping and importing DVD ISO/IFO files and you will be kept informed of timely state with a progress dialogue box.

When it has been imported successfully, you can preview the whole movie and select the subtitle and audio you want.

dvd to galaxy tab 3 Copy/Transfer DVD ISO/IFO to Galaxy Tab 3 10.1

2. Choose Galaxy Tab 3 10.1  friendly format.

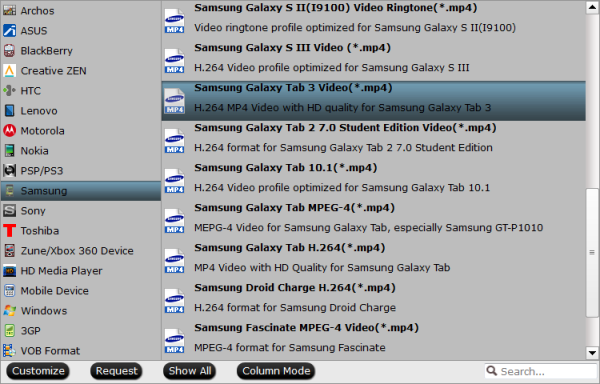
Click “Format” menu to find the “Samsung” option in the dropdown list, choose “Samsung Galaxy Tab 3 Video (*.mp4)” for output. It is the most compatible format, which is especially made for Galaxy Tab 3 10.1.

galaxy tab 3 format Copy/Transfer DVD ISO/IFO to Galaxy Tab 3 10.1

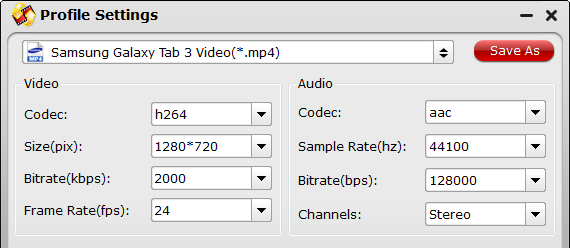
Besides, click “Settings” button on the interface, you will be able to check and adjust the video and audio parameters like bitrate, size, channels, etc. Just do it when you need.

galaxy tab 3 settings Copy/Transfer DVD ISO/IFO to Galaxy Tab 3 10.1

3. Convert DVD ISO/IFO image file to Galaxy Tab 3 10.1 MP4.

You can “Browse” your computer to choose a new folder for output file before conversion. When everything is ready, click “Convert” button to start converting DVD ISO/IFO image file to MP4 Galaxy Tab 3 10.1, then “Open” button will show you the location of output files.

Pavtube DVDAid More Features:

  • Edit the videos before conversion, such as trim, crop, add subtitles, video effect, etc.
  • Convert DVD to many other mobile devices and editing software like iPad 3, iPad mini, ATV 3, Nexus 10, Galaxy Tab 3, S4, Note 2, Sony Vegas and more.
  • Add srt, ass, ssa subtitles to your movies.
  • Backup DVD main movie to VOB format with original quality.

Now you can watch DVD ISO/IFO fils on Galaxy Tab 3 10.1 anytime and anywhere. Hope it will help you.

Related Articles:

Rip latest 3D Blu-ray movies to Galaxy Tab 3 10.1 on Mac
Move DVD movies to Galaxy Tab 3 10.1/8.0 on Windows/Mac
Copy Blu-ray Blu-ray ISO contents to Samsung Galaxy Tab 3 10.1/8.0

share medium Copy/Transfer DVD ISO/IFO to Galaxy Tab 3 10.1

Hot News! Pavtube Studio provides you promotional items that you can enjoy freebies and up to 66% off discount, buy one get one free on its featured Blu-ray/DVD and video tools at its 2013 Thanksgiving Special offer  from November 7, 2013 to December 10, 2013.

Our Thanksgiving activities designed for you are on the way now: All the products on Pavtube will be promotional items that enjoy a rather lower price, and more surprisingly, if you are our Pavtube Facebook fans you can win the chance to obtain our hot-selling free product and get another 20% off discounted product only by sharing this activity on your Facebook. Also you can get Buy 1 Get 1 Free and UP to 66% off promotion at Pavtube official site before December 10, 2013. We hope all of you can receive our Thanksgiving wishes and have a happy Thanksgiving.

thanksgiving crazy discount 2013 Thanksgiving Special Offer: Freebies, Up to 66% off and Buy One Get One Free

Part 1. Thanksgiving Best Sellers - 20% ~ 30% off

1. Pavtube Blu-ray Ripper - $34.3 (original $49)
Highlights: full disc copy; Directly Copy only main movie; rip any Blu-ray/DVD to various formats

2. Pavtube DVD Ripper - $24.5 (original $35)
Highlights: convert standard DVDs to MP4, MKV, AVI, MPEG, MOV, M4V for smartphones, tablets, HD media players and more

3. Pavtube Video Converter - $28 (original $35)
Highlights: transcode videos to virtually any video/audio format for editing and playback

4. Pavtube Video Converter Ultimate - $52 (original $65)
Highlights: combination of a Blu-ray ripper, a DVD ripper and a Video converter to meet your needs for Blu-ray, DVD and video conversion

Part 2. Thanksgiving Giveaway - Free Softwares

1. Pavtube Free DVD Ripper - a fun, easy and fabulous way to rip DVDs to various video formats with fast speed. Support adding SRT, ASS, SSA subtitles.

2. Pavtube Free Video DVD Converter Ultimate - provides with full Blu-ray, DVD and video solutions for your ultimate multimedia entertainment needs.

Part 3. Buy One Get One Free

1. Buy MTS/M2TS Converter – handle AVCHD MTS/M2TS footages in an easy way
Free Get FLV/F4V Converter – convert any YouTube or Hulu videos (FLV/F4V) for portable devices

2. Bug MXF Converter - encode MXF clips for editing and playback
Free Get MKV Converter – convert MKV media contents to Android, Windows and iOS devices

3. Bug HD Video Converter - get your camera videos and TiVo recordings onto editors and players
Free Get DVD Creator – burn any kind of video sources to playable DVD

Part 4. Thanksgiving Hot Deals - Only $9.9

1. Pavtube MKV Converter - select wanted subs/audio/video track from MKV to be kept in the output files
2. Pavtube FLV/F4V Converter – convert, trim, crop FLV or F4V to other formats
3. Pavtube TOD Converter - fast convert, compress, and edit TODs from JVC camcorders for any portable devices
4. Pavtube MOD Converter – stream, convert and edit MOD recordings shot by camcorders(JVC, Panasonic, Sony)

Part 5. Sharing at your Facebook page - Get more discount

1. 20% off ByteCopy (Windows/Mac)
2. 20% off MXF MultiMixer
3. 20% off iMixMXF

Click “Share on Facebook” button, insert “#PavtubeThanks2013″, choose “Public”, and click “Share Link”. You will get another 20% coupon. The discounted link will be sent to your Facebook “Inbox” or “Other” within 24 hours on work days.

If don’t receive message from strangers, please don’t forget to contact us for the discounted link via faq@pavtube.com.

fb share 2013 Thanksgiving Special Offer: Freebies, Up to 66% off and Buy One Get One Free

More Pavtube Thanksgiving Special Deals are available on Pavtube Thanksgiving page. Share this activity at your Facebook page and more discounts you can get.

Part 6. Hot Bundle Deals - Save Up to $35

1. ByteCopy($42) + Blu-ray Video Converter Ultimate($65) = Only $80, Save $27
2. ChewTune ($29) + Blu-ray Video Converter Ultimate($65) = Only $75, Save $19
3. ChewTune($29) + ByteCopy($42) = Only $54, Save $17
4. ByteCopy($42) + DVD Creator($35) = Only $60, Save $17
5. ByteCopy($42) + MXF MultiMixer($45) = Only $70, Save $17
6. ByteCopy($42) + Video Converter($35) = Only $60, Save $17
7. Blu-ray Video Converter Ultimate($65) + DVD Creator($35) = Only 65$, Save $35

share medium 2013 Thanksgiving Special Offer: Freebies, Up to 66% off and Buy One Get One Free

This article will focus on the fast way to backup blu-ray main movie with Pavtube Blu-ray Ripper in high quality without any A/V sync problem.


Just thought I’d send a little feedback in case this happens to anyone else.
All the source video files were from Blu-ray discs.

1)When viewing the original movie in the preview, the sound issue did not appear.
2) The output was an .avi file
3) I copied the movies and watched them directly off my external hard drive through my television (Samsung brand)

I have tried to convert my blu-rays to .avi format for playing on my Samsung TV. Having tried some programs like DVDFab, MakeMKV and Mezzmo, but I got Audio Sync problem with all of them. But now I find Pavtube BDMagic, I tried its “Directly Copy” option which seemed to work perfectly and has fixed the problem. As one joint m2ts file should be better for further playback, editing, sharing or burning disc, so I just need to backup blu-ray main movie to M2TS file with original quality and no conversion. The process is extremely fast.

Overall, it is  Only one all-in-one program will help you to get everything done. It can deal with the lastest blu-ray movies like Pacific Rim, Despicable Me 2, The Heat, Monsters University, etc. Also, it is capable of saving a decrypted multi-track m2ts file without encoding, which will completely keep the quality of original blu-ray. (Tested a 27GB Blu-ray disc, only 30 minutes to back up the main movie on Windows 8.)

Free download Pavtube BDMagic (BDMagic for Mac is available for Mac users) to backup intact blu-ray main movie and install it.

Key features of BDMagic:

* Rip the latest blu-ray/DVD including 3D blu-ray
* Directly Copy blu-ray/DVD main movie with multiple audio and subtitle streams
* Convert blu-ray/DVD to a variety of video formats
* Full Disc Copy blu-ray/DVD’s original file structure to BDMV folder

Guide of how to backup intact blu-ray main movie:

Step 1: Select blu-ray source.

When launch it, click Load files button on the top left, you will get three options:

  • Load the disc: Inserted discs are usually recognized and listed automatically, just select the one you desired.
  • Load from the folder: When you have copy the content of disc to computer or hard device, use this option to select the folder to import.
  • Load ISO/IFO: If your blu-ray source is ISO file, use this option to load.

Once imported, you will get a list of titles on the source. The main title with longest duration usually has been selected automatically.

blu ray to galaxy tab Easy and Fast way for ripping/copying Blu ray main movies with original quality

Step 2: Choose Directly Copy for output.

Firstly, go to select the location of output files. Simply click “Browse” button and choose the destination folder.

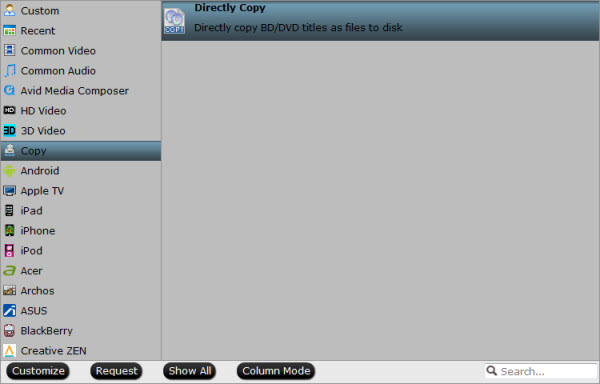
Secondly, click “Format” menu you will find lots of format options in the dropdown list. Here “Directly Copy” is the best choice for you because it will copy the intact main movie without any recoding. In this way, you will get a lossless m2ts file at amazing conversion speed.

bdmagic directly copy Easy and Fast way for ripping/copying Blu ray main movies with original quality

Note: Many other video formats are listed there. You can select different output video formats according to your different requirements. If you want to convert blu-ray to various formats for smartphones or edit software, you are free to choose the one you need.

Step 3: Backup lossless blu-ray main movie.

Now it is time to start conversion by clicking big “Convert” button. Then click “Open” button you will find a quick way to locate the generated files. Once completed, you can get one lossless m2ts file with multiple streams from original blu-ray.

As the generated m2ts file is intact backup of blu-ray main movie, so it will retain all the multiple audio and subtitle tracks and it cannot be selected during conversion. If you want to remove some undesired tracks, you can count to Free tsMuxeR for help.

How to select multiple tracks in m2ts file (optional):

After having downloaded it, unzip the tsMuxeR you will get the command line version and GUI version, which is tsMuxeR.exe and tsMuxeR GUI.exe. Double click tsMuxeR GUI to run the program and then follow below guide.

1. Click “Add” button to import m2ts files and you will find the tracks information listed.
2. Uncheck the undesired tracks in the list.
3. Select “M2TS muxing” option for output.
4. Choose the output folder for generated files by hitting “Browse” button.
5. Click “Start muxing” button to remove the undesired tracks.

Tips: If you have difficulty in playing m2ts files, you are recommended to try free VLC media player. It will help you to completely enjoy blu-ray movie.

It works easily and at high efficiency. With it backup intact blu-ray main movie is no long the complicated thing. Now take time to enjoy these blu-ray main movie with your Samsung TV.

Tips:

Pavtube ByteCopy allows users lossless backup Blu-ray/DVD to MKV with multiple audio tracks and subtitles as well as original chapter markers preserved.

share medium Easy and Fast way for ripping/copying Blu ray main movies with original quality

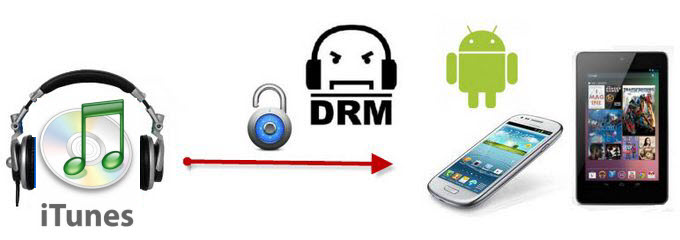
This article aims to introduce an easy way to unlock iTunes purchased movie and convert DRM M4V video to Android OS Tablets & Phones for playback on Windows and Mac.

Android OS Tablets & Phones are rapidly gaining in popularity these days, and it reported lately, the collective recent sales of all Google Android OS tablet exceed those of the iPad in the US for the first time. Google itself, Samsung, Sony, Motorola, HTC, LG and other handset manufacturer offered a variety of Android OS powered phones coming with big screen. With the big screen, watching HD movies on Android tablets & Phones anytime anywhere is a nice choice.

play drm video on android How to Play and Watch iTunes Movies on Android Phone/Tablet

Android Os takes large shares in today’s market. Here in this post, we may share Androis users a little use skill on how to put iTunes videos to Android tablet & phones for playback. So if you want to play iTune M4V movies on Android OS Tablets & Phones, firstly you need to remove DRM protection, and then do a iTunes video recorder to Android compatible formats. In this article, we will introduce the easiest and most reliable way to transfer DRM protected videos to Android OS Tablets & Phones playable format.

With this versatile  iTunes to Android Recorder tool, you can easily remove DRM protection and also recorder M4V video to MP4 format as the most compatible format on Android Tablets & Phones. After recording, the output quality is still as vivid as original. Free download DRM Converter for Android tablet & phones, and get your iTunes movie recording process started.

Money-saving Trip:


Tutorials: Remove DRM protection and Record iTunes M4V Video to Android OS Tablets & Phones

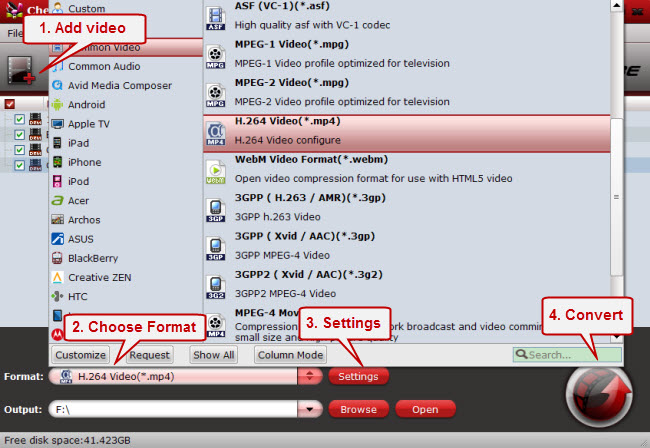
Step 1. Load .m4v videos.

Run this Pavtube Chewtune as a top DRM Removal Software and DRM Video Recorder, and add videos. Drag and drop your videos to it directly, or you can click icon to import them as below.

itunes drm to android How to Play and Watch iTunes Movies on Android Phone/Tablet

Step 2. Choose format.

Click the drop-down-list besides “Format” and choose “Common Video> H.264 Video(*.mp4)” as the most compatible format with Android OS Tablets & Phones.

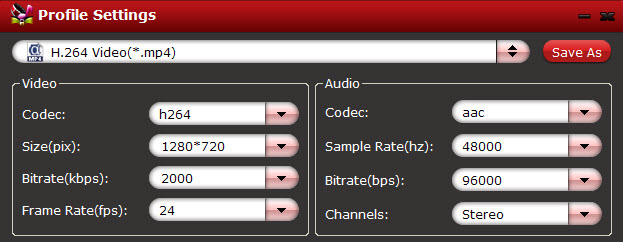
Step 3. Change video specs.

Click “Settings” to enter Profile Settings window, you can find settings for video size, codec, bitrate and frame rate. For Moto X, you are suggested to set the Size to 1280*720; and bitrate will be fine from 1500 to 2500k.

specs for android How to Play and Watch iTunes Movies on Android Phone/Tablet

Step 4. Start iTunes M4V to Android recorder.

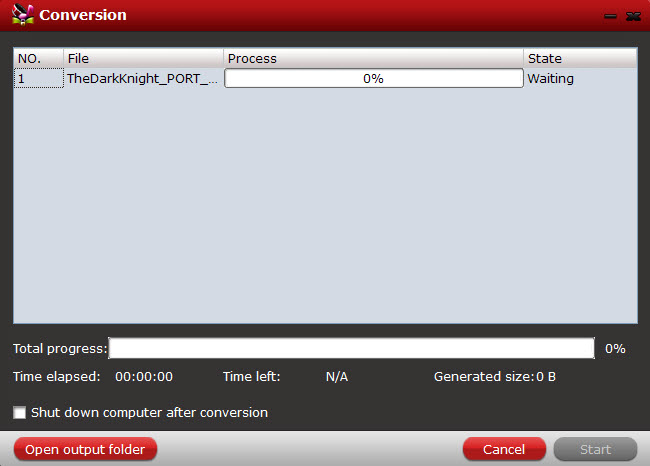
Now click the “Convert” icon to start removing DRM from iTune M4V videos and recording iTunes videos to Android OS Tablets & Phones for playing; this DRM Video Recorder will activate your iTunes automatically and start to play this video. The player windows cannot be removed or closed.

In the meanwhile, it will start to record this video in MP4 real-time. The conversion time is equal to the video length itself; you can do other tasks during the converting the process.

Note: The system volume could turn off temporally during this period; no worries, do not touch it to get perfect DRM removed video.

After the conversion, click “Open output folder” to quick locate the converted video.

conversion window How to Play and Watch iTunes Movies on Android Phone/Tablet

Tips:

1. The DRM removing process may mislead your anti-virus software to falsely report virus/worm. Please ignore the report to keep on ripping.

2. This product cannot convert unplayable video (damaged, unauthorized, etc).

How to transfer the converted iTunes M4V video to Android OS Tablets & Phones?

Windows transfer

1. Connect your device to the USB port on your computer. Its USB storage is mounted as a drive and appears on your computer screen.
2. Copy files back and forth as you would using any other external device.
3. When you finish, eject the device from within Windows before unplugging the USB cable.

Mac OS transfer

1. Install Android File Transfer from www.android.com/filetransfer, and follow the instructions there. (If you are using Android File Transfer for the first time, double-click it to open it. After the first connection, it opens automatically whenever you connect.)
2. Connect your device to your computer with a USB cable. Android File Transfer starts, if it’s not already running, and opens a window that displays the contents of your device, along with storage space details at the bottom of the window.
3. Work with this window much as you do in the Finder window: open and close folders, create new folders, and drag files to or from it and other Finder windows.
4. Disconnect the USB cable when you finish.

Related settings: To change your device’s USB connection options, touch Settings > Device > Storage > Menu > USB computer connection.

Related articles:

share medium How to Play and Watch iTunes Movies on Android Phone/Tablet

Have some disney 2D/3D Blu-ray collections? And want to get them ready for you Galxy Tab 3 with 3D effect? Follow this simple tutorial to learn how to convert 2D/3D Blu-rays to SBS 3D MP4 format for Samsung Galaxy Tab 3.

Walt Disney Home Entertainment has officially announced and detailed the Blu-ray release of DisneyToon Studios’ Planes, which is set to arrive via 2D and 3D BD/DVD/Digital Copy combo packs later this fall. The high-flying animated adventure features the voice talents of Dane Cook, Stacy Keach, Priyanka Chopra, Cedric the Entertainer, Julia Louis-Dreyfus and John Cleese, and streets on November 19th. Perhaps you may have got some Disney 2D/3D Blu-ray movies, and face difficulties to get these protected blu-ray files onto your Samsung Galaxy Tab 3 for playback on the go.

disney 2d 3d blu ray How to watch Disney 2D/3D Blu ray on Galaxy Tab 3 with SBS 3D effect?

Samsung Galaxy Tab does not carry a disc drive so that Blu-rays are not supported directly. Besides, most commercial Blu-rays are encrypted by film studio so that they cannot be copied. To watch Disney 2D/3D Blu-rays on Galaxy Tab 3, you need to rip blu-ray to Galaxy Tab 3 supported format first. And then to get the output video with 3D effect, the easiest way to convert 2D/3D Disney Blu-ray to side-by-side 3D MP4 video

Here, Pavtube 3D Blu-ray Ripper is the best 3D/2D Blu-ray to Side-by-Side 3D ripper to assist you with ripping Disney 2D/3D Blu-ray to side-by-side 3D MP4 for Galaxy Tab 3 playback with perfect audio and video synchronization. Mac users could use 3D Blu-ray Ripper for Mac which is specially designed for Mac users to create 3D SBS MP4 video out of 3D/2D Blu-ray movies.

Full Guide: Rip Disney 2D/3D Blu-ray movie to SBS 3D MP4 video for Galaxy Tab 3 playback?

(Tips: If you want to rip 2D/3D Blu-ray to side-by-side 3D MKV for playing on 3D devices, please refer to this guide: Rip 2D/3D Blu-rays to side-by-side 3D MKV for playing on a 3D Device)

Step 1: Load 3D/2D Blu-ray Disc.

Open Pavtube 30% off BDMagic and load your source Blu-ray movie.

blu ray to sbs mp4 How to watch Disney 2D/3D Blu ray on Galaxy Tab 3 with SBS 3D effect?

Step 2: Choose suitable profile.

From the “Format” drop-down list, you are suggested to follow the path “3D Video > MP4 Side-by-Side 3D Video(*.mp4)” for ripping 2D/3D Blu-ray to side-by-side 3D MP4 video.

mp4 side by side 3d video How to watch Disney 2D/3D Blu ray on Galaxy Tab 3 with SBS 3D effect?

Step 3: Adjust profile presets (Optional).

If you like, you could set profile parameters to get better video quality, such as video codec, file size, video bitrate, frame rate, etc.

bluray 3d sbs mp4 settings How to watch Disney 2D/3D Blu ray on Galaxy Tab 3 with SBS 3D effect?

Step 4: Start ripping 2D/3D Blu-ray to side-by-side 3D MP4 video for Galaxy Tab 3.

Double check above steps and you could click the “Convert” button on program interface to start ripping Disney 2D/3D Blu-ray to side-by-side 3D MP4 video for Galaxy Tab 3. After it finished, open output file destination, locate the created SBS 3D MP4 video and you could watch it on your Galaxy Tab 3 anytime and anywhere.

Read more:

Can Galaxy Tab 3 8.0 Play DVD (ISO/IFO image file)
Enable Galaxy Tab 3 to play MKV/AVI/VOB/Tivo/MPG/WMV/FLV/F4V video

share medium How to watch Disney 2D/3D Blu ray on Galaxy Tab 3 with SBS 3D effect?

What is a pity is that Kindle Fire HDX doesn’t add support for Google apps. So here offers you some tips and trick for the way for installing Google Apps on the Kindle Fire HDX. Just get the solution now.


Kindle Fire tablets HDX 7 and 8.9 inches, are a real bargain considering the provision incorporating hardware. The cons always come from the so closed software for your operating system modified. Although we install most existing Android applications, the applications Google are not. An Android enthusiast has been able to bring Gmail, Play Music, Google Maps, YouTube, Chrome and other applications. Kindle Fire HDX sports a high resolution screen, a very fast processor, and generally excellent media abilities, but one thing it lacks is support for Google apps.

Luckily for us Amazon still lets users install apps downloaded from sites other than the Amazon Appstore, because one blogger going by Android Cowboy has found a way to add Gmail and a few other Google apps to Amazon’s tablet.

His trick is similar to the hack which let me install Gmail, Google Reader, and other Google apps on the Kindle Fire HD last year. He’s gotten Gmail, Google Play Books, Chrome, and Google Search working on the Fire HDX, but at this point Google Play Store and Google+ still don’t work.

kindle fire HDX google apps How to Install Google Apps on the Kindle Fire HDX

Here’s how you do it.

First, you’ll need a file manager or some other way to access the install files on your Kindle Fire HDX. Amazon won’t let you do this via their setup, unfortunately, so I recommend that you head over to this post and install the 5 apps I suggested for the Kindle Fire HD. Or you could skip that and install ES File Explorer, an app which you can find in the Amazon Appstore on your Fire HDX.

Download the following files and transfer to your Kindle via USB connection to your PC. I suggest that you copy them to the “download” folder of the Kindle Fire HDX; it will be the easiest to find again.

Open the ES File explorer app and then open the download folder. Select and installGoogle Account Manager.
If you are prompted by a warning that app installs are blocked, follow the prompts to go to the settings menu and change the appropriate setting. Then go back to ES File explorer and try to install Google Account Manager again.
Reboot your Kindle Fire HDX by pressing and holding the power button and then selecting the shutdown option. Then restart it.

Install Google Services Framework.
Reboot.
Install Google Play Services.
Reboot.
Install Gmail.
Reboot.

At this point you should be able to open the Gmail app and log in to your account. You can ignore any warning messages.

Once you’ve logged into your Gmail account you can then download and install other Google apps. If you need help finding the apps, check out the 1Mobile app store. That is one of the better sources of free apps, including reading apps, utilities, and even Google apps.

Last year I reported on a similar trick which let me add Google apps to the Kindle Fire HD, but unfortunately it turned out to be less useful than I had hoped. The Kindle Fire HD (2012) didn’t support notifications and running Google apps in the background, and as a result some apps (Gmail, for example) would only check for new content when they were open.

I am concerned that the HDX might have the same issue. I’d love to hear back from anyone who tries this. How well did it work? Hope it helps~

Source: The Digital Reader

Read more:

Convert and Play DVD on Kindle Fire HDX 7/8.9
Download, Transfer and Sync media Files to Your Kindle Fire HDX

share medium How to Install Google Apps on the Kindle Fire HDX

Just bought the new iPad Air? Has it ever occurred to you that it is troublesome to transfer videos from iPad Air to computer because Apple need to keep iTunes customers from copying DRM files. Well, we have some easy solutions.

ipadair How to Transfer Videos from iPad Air to Computer

Everyone knows Speaking at today’s launch event in San Francisco, Phil Schiller announced the next iteration of the company’s tablet. It’s thinner, lighter and more powerful — hence the new name: the iPad Air Air. (No more of that “new iPad Air” nonsense.) And Cupertino takes that moniker seriously; this slate weighs just one pound (down from the fourth-gen model’s 1.4 pounds). When you need to backup and transfer videos from iPad Air to your PC computer or Mac, how to do it?

My friend gave me a suggestion, he said that maybe you can transfer movies to iCloud. First,you can backup your ipad air movies to the iCloud, and then you can extract movies from iCloud to your Computer, this is a good way!

Sometimes you want to transfer some data to computer for backing up or watch or edit videos on computer! So here we will tell you how to transfer videos and music from iPad Air to computer, no matter whether them are purchased from iTunes or not!

Transferring with iTunes and iCloud

This method is for transferring those purchased videos and music from iTunes.

With iTunes

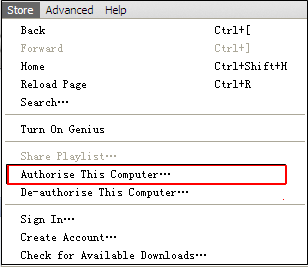
1. To make sure to authorize your computer before connecting iPad Air, follow the steps (“Store“menu, choose Authorize Computer and enter Apple ID and password).

authorise How to Transfer Videos from iPad Air to Computer

2. Connect your iPad Air to the computer.

3. Click the Transfer Purchases button.

You can right-click (Windows or Mac) your device in the iTunes Source list, then choose Transfer Purchases from the shortcut menu that appears.

transfer How to Transfer Videos from iPad Air to Computer

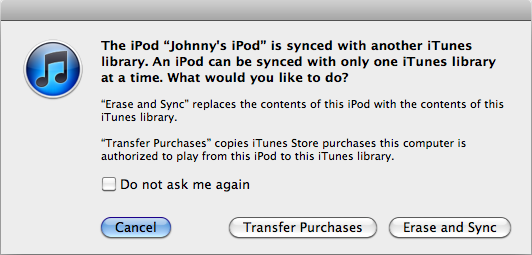
If you connect your iOS devices for the first time, one dialog may appear automatically as follow , you just click the Transfer Purchases button.

sync issue How to Transfer Videos from iPad Air to Computer

With iCloud

iCloud is a wonderful service for sharing or backing up your data, so you also can transfer videos and music with it. First of all, you should share your data onto iCloud. Then you need to download from iCloud again to computer. In addition, it requires lots of wireless data to finish the process. So if transferring with iCloud, you have better make sure the Wi-Fi is available for your iPad Air.  It is teach you How to transfer movies iPad air to your Computer. You can try it for free. Good luck!

Having many halloween video collections, want to convert these movie files to your iPad Air for playback, now follow the artcicle below:

Rip/Convert Blu-ray Movies for enjoying on iPad Air
Convert MKV, AVI, Tivo, VOB, WMV, MPG, FLV to iPad Air
Transfer and Play DVD movies on iPad Air
Get Sony 4K XAVC/XAVC S Files onto iPad Air for playback 

share medium How to Transfer Videos from iPad Air to Computer