Have just got a new Sony Xperia XZ or Xperia XZ Premium smartphone in hand and wish to transfer and play your favorite DVD movies onto the smartphone when you are traveling on the road. The following part will show you how to rip DVD for Sony Xperia XZ/XZ Premium watching on the move.
Sony Xperia XZ/XZ Premium supported file formats
Before ripping DVD for Sony Xperia XZ/XZ Premium, you should first be clear of what digital file formats can be viewed on Xperia XZ/XZ Premium. From Sony’s official page, we get the information that you can play the following video and audio file formats on Xperia XZ/XZ Premium:
Video Playback: 3GPP, MP4, M4V, MKV, AVI, XVID, WEBM
Audio playback: AAC, AMR-NB, AMR-WB, FLAC, MIDI, MP3, PCM, Vorbis, WMA
Rip DVD for Sony Xperia XZ/XZ Premium Playing
To get DVD movies played on Sony Xperia XZ/XZ Premium, you will need a specific DVD Ripper program to bypass the copy and region code protection from DVD movies and then convert the non protected DVD movies into Sony Xperia XZ/XZ Premium playable file formats. Here, a one stop solution tool called Pavtube DVDAid is highly recommended to you. With the program, you can powerfully and automatically bypass all DVD copy protection and region code with its built-in decrypter tool, and then easily rip the copy-free DVD movies into Xperia XZ/XZ Premium readable video and audio file formats listed above.
Hot Search: DVD to Sony Xperia Z6 | HD Video to Xperia Z5/Z4/Z3/Z2/Z1 | Xperia Z Supported File Formats
Adjust output profile parameters
To get better output video and audio quality, click “Settings” on the main interface to open “Profile Settings” window, here, you can flexibly choose or specify exactly the profile parameters including video codec, resolution, bit rate, frame rate, audio codec, bit rate, sample rate, channels, etc as you like.
Change output video aspect ratio
The DVD movies use an aspect ratio of 4:3, which doesn’t match with the screen aspect ratio of Sony Xperia XZ/XZ Premium, when you try to play the DVD movies on Sony Xperia XZ/XZ Premium, there will be black bars aroud the video due to the incompatible aspect ratio. The good news is that you can easily fix this problem by changing output video aspect ratio with the “Crop” function in the “Editor” window.
For Mac users, you can download Pavtube DVDAid for Mac to rip DVD for Sony Xperia XZ/XZ Premium watching on macOS Sierra or macOS High Sierra.
|
Get Pavtube DVDAid with 20% off discount, coupon codec: 45K2D47GJH
|
Step by Step to Rip DVD Movies for Sony Xperia XZ/XZ Premium Playing
Step 1: Import DVD Movies.
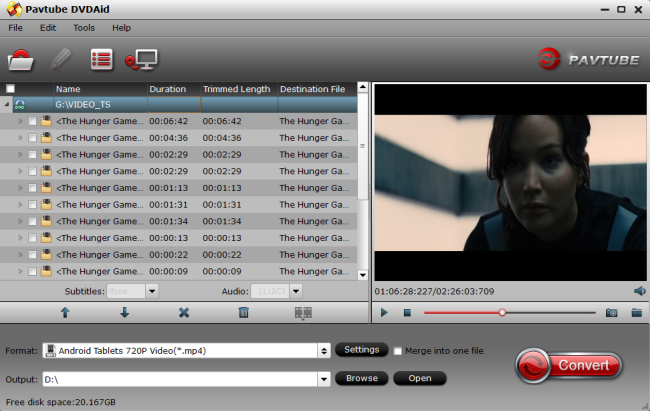
Download, install and run this DVD ripper. You can load DVD by clicking “File” > “Load from disc”. Or load DVD Folder by clicking “File” > “Load from folder” or load DVD IFO/ISO image by clicking “File” > “Load IFO/ISO”.

Step 2: Define the output format.
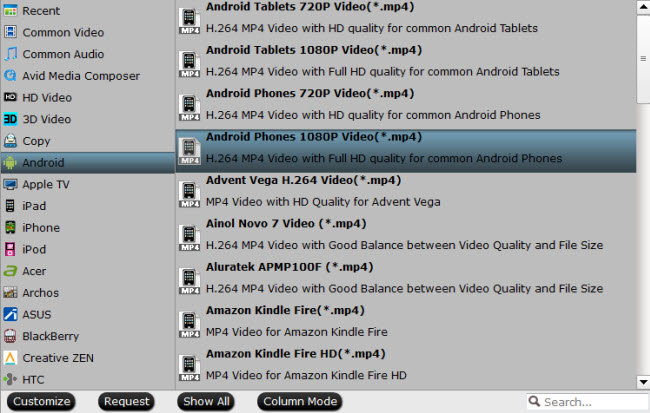
Clicking the Format bar, from its drop-down list, since Sony Xperia XZ/XZ Premium features full HD 1920×1080 and Android operating system, setting HD MP4 as output format couldn’t be great! Click the format to follow “Android” > “Android Phones 1080P Video (*.mp4).”

Tips: Click “Settings” on the main interface to open “Profile Settings” window, here, you can flexibly choose or specify exactly the profile parameters including video codec, resolution, bit rate, frame rate, audio codec, bit rate, sample rate, channels, etc as you like to get better output video and audio quality.
Step 3: Adjust output video aspect ratio.
Open the “video editor” window, click the “Crop” tab. In the “Crop” window, switch to the “Advanced Mode”. To keep the cropped aspect ratio, there are several aspect ratios for you to choose from, including 16:10, 16:9, 5:4, 4:3, 3:2, and 2:1. Once you select your TV compatile “Display aspect ratio”, the “green crop frame” will keep this ratio to crop video and you are able to preview the final effect in real time. If you want to keep the same aspect ratio in your final output files, do remember to set the Video “Size (pix)” in “Settings” section as the same ratio as display aspect ratio.

Step 4: Begin the conversion process.
After all setting is completed, hit the ”Convert” button at the right bottom of the main interface to begin the conversion process from DVD to Sony Xperia XZ/XZ Premium conversion process.
When the conversion is finished, click “Open Output Folder” icon on the main interface to open the folder with generated files. When the conversion is completed, feel free to transfer and play the converted files to Xperia XZ/XZ Premium for watching on the move.
Related Articles
Any Product-related questions?support@pavtube.com


Leave a Reply