Welcome to Delicate template
Header
Just another WordPress site
Header

Author Archives: mobmshare

This article will focus on the fast way to backup blu-ray main movie with Pavtube Blu-ray Ripper in high quality without any A/V sync problem.


Just thought I’d send a little feedback in case this happens to anyone else.
All the source video files were from Blu-ray discs.

1)When viewing the original movie in the preview, the sound issue did not appear.
2) The output was an .avi file
3) I copied the movies and watched them directly off my external hard drive through my television (Samsung brand)

I have tried to convert my blu-rays to .avi format for playing on my Samsung TV. Having tried some programs like DVDFab, MakeMKV and Mezzmo, but I got Audio Sync problem with all of them. But now I find Pavtube BDMagic, I tried its “Directly Copy” option which seemed to work perfectly and has fixed the problem. As one joint m2ts file should be better for further playback, editing, sharing or burning disc, so I just need to backup blu-ray main movie to M2TS file with original quality and no conversion. The process is extremely fast.

Overall, it is  Only one all-in-one program will help you to get everything done. It can deal with the lastest blu-ray movies like Pacific Rim, Despicable Me 2, The Heat, Monsters University, etc. Also, it is capable of saving a decrypted multi-track m2ts file without encoding, which will completely keep the quality of original blu-ray. (Tested a 27GB Blu-ray disc, only 30 minutes to back up the main movie on Windows 8.)

Free download Pavtube BDMagic (BDMagic for Mac is available for Mac users) to backup intact blu-ray main movie and install it.

Key features of BDMagic:

* Rip the latest blu-ray/DVD including 3D blu-ray
* Directly Copy blu-ray/DVD main movie with multiple audio and subtitle streams
* Convert blu-ray/DVD to a variety of video formats
* Full Disc Copy blu-ray/DVD’s original file structure to BDMV folder

Guide of how to backup intact blu-ray main movie:

Step 1: Select blu-ray source.

When launch it, click Load files button on the top left, you will get three options:

  • Load the disc: Inserted discs are usually recognized and listed automatically, just select the one you desired.
  • Load from the folder: When you have copy the content of disc to computer or hard device, use this option to select the folder to import.
  • Load ISO/IFO: If your blu-ray source is ISO file, use this option to load.

Once imported, you will get a list of titles on the source. The main title with longest duration usually has been selected automatically.
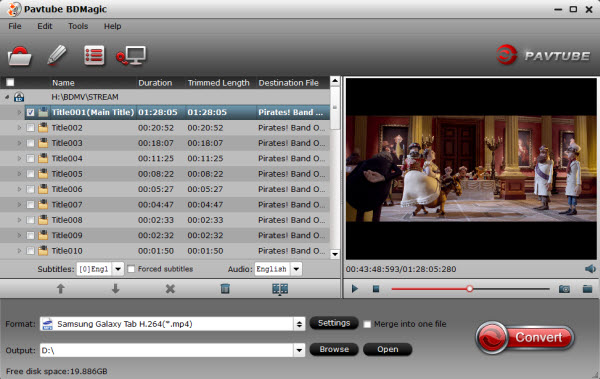
blu ray to galaxy tab Easy and Fast way for ripping/copying Blu ray main movies with original quality

Step 2: Choose Directly Copy for output.

Firstly, go to select the location of output files. Simply click “Browse” button and choose the destination folder.

Secondly, click “Format” menu you will find lots of format options in the dropdown list. Here “Directly Copy” is the best choice for you because it will copy the intact main movie without any recoding. In this way, you will get a lossless m2ts file at amazing conversion speed.
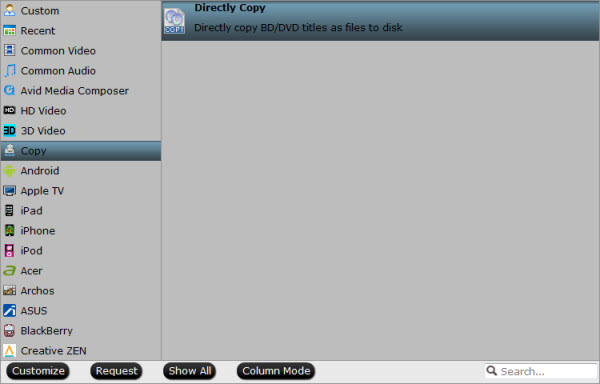
bdmagic directly copy Easy and Fast way for ripping/copying Blu ray main movies with original quality

Note: Many other video formats are listed there. You can select different output video formats according to your different requirements. If you want to convert blu-ray to various formats for smartphones or edit software, you are free to choose the one you need.

Step 3: Backup lossless blu-ray main movie.

Now it is time to start conversion by clicking big “Convert” button. Then click “Open” button you will find a quick way to locate the generated files. Once completed, you can get one lossless m2ts file with multiple streams from original blu-ray.

As the generated m2ts file is intact backup of blu-ray main movie, so it will retain all the multiple audio and subtitle tracks and it cannot be selected during conversion. If you want to remove some undesired tracks, you can count to Free tsMuxeR for help.

How to select multiple tracks in m2ts file (optional):

After having downloaded it, unzip the tsMuxeR you will get the command line version and GUI version, which is tsMuxeR.exe and tsMuxeR GUI.exe. Double click tsMuxeR GUI to run the program and then follow below guide.

1. Click “Add” button to import m2ts files and you will find the tracks information listed.
2. Uncheck the undesired tracks in the list.
3. Select “M2TS muxing” option for output.
4. Choose the output folder for generated files by hitting “Browse” button.
5. Click “Start muxing” button to remove the undesired tracks.

Tips: If you have difficulty in playing m2ts files, you are recommended to try free VLC media player. It will help you to completely enjoy blu-ray movie.

It works easily and at high efficiency. With it backup intact blu-ray main movie is no long the complicated thing. Now take time to enjoy these blu-ray main movie with your Samsung TV.

Tips:

Pavtube ByteCopy allows users lossless backup Blu-ray/DVD to MKV with multiple audio tracks and subtitles as well as original chapter markers preserved.

share medium Easy and Fast way for ripping/copying Blu ray main movies with original quality

This article aims to introduce an easy way to unlock iTunes purchased movie and convert DRM M4V video to Android OS Tablets & Phones for playback on Windows and Mac.

Android OS Tablets & Phones are rapidly gaining in popularity these days, and it reported lately, the collective recent sales of all Google Android OS tablet exceed those of the iPad in the US for the first time. Google itself, Samsung, Sony, Motorola, HTC, LG and other handset manufacturer offered a variety of Android OS powered phones coming with big screen. With the big screen, watching HD movies on Android tablets & Phones anytime anywhere is a nice choice.

play drm video on android How to Play and Watch iTunes Movies on Android Phone/Tablet

Android Os takes large shares in today’s market. Here in this post, we may share Androis users a little use skill on how to put iTunes videos to Android tablet & phones for playback. So if you want to play iTune M4V movies on Android OS Tablets & Phones, firstly you need to remove DRM protection, and then do a iTunes video recorder to Android compatible formats. In this article, we will introduce the easiest and most reliable way to transfer DRM protected videos to Android OS Tablets & Phones playable format.

With this versatile  iTunes to Android Recorder tool, you can easily remove DRM protection and also recorder M4V video to MP4 format as the most compatible format on Android Tablets & Phones. After recording, the output quality is still as vivid as original. Free download DRM Converter for Android tablet & phones, and get your iTunes movie recording process started.

Money-saving Trip:


Tutorials: Remove DRM protection and Record iTunes M4V Video to Android OS Tablets & Phones

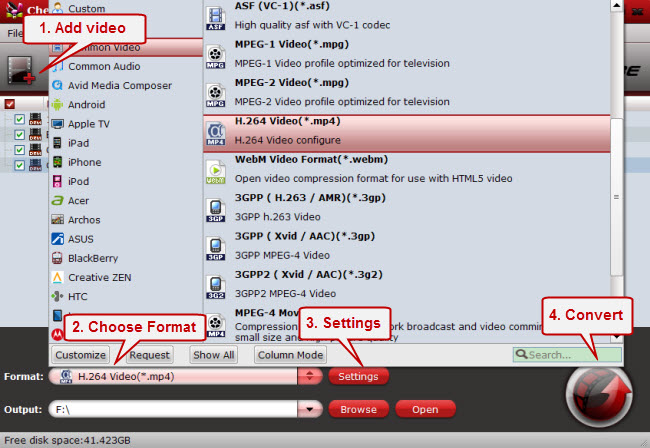
Step 1. Load .m4v videos.

Run this Pavtube Chewtune as a top DRM Removal Software and DRM Video Recorder, and add videos. Drag and drop your videos to it directly, or you can click icon to import them as below.

itunes drm to android How to Play and Watch iTunes Movies on Android Phone/Tablet

Step 2. Choose format.

Click the drop-down-list besides “Format” and choose “Common Video> H.264 Video(*.mp4)” as the most compatible format with Android OS Tablets & Phones.

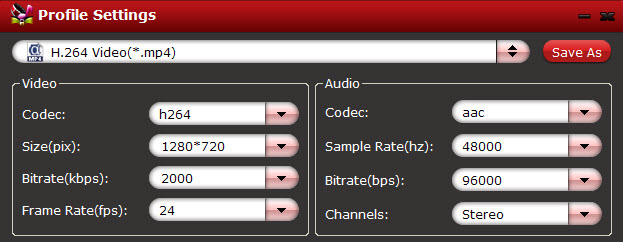
Step 3. Change video specs.

Click “Settings” to enter Profile Settings window, you can find settings for video size, codec, bitrate and frame rate. For Moto X, you are suggested to set the Size to 1280*720; and bitrate will be fine from 1500 to 2500k.

specs for android How to Play and Watch iTunes Movies on Android Phone/Tablet

Step 4. Start iTunes M4V to Android recorder.

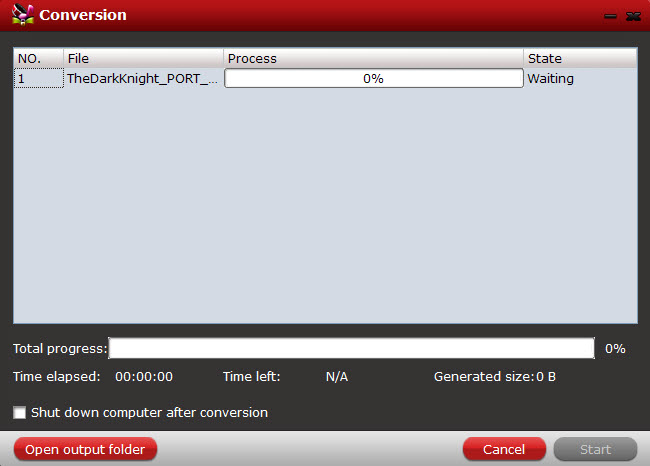
Now click the “Convert” icon to start removing DRM from iTune M4V videos and recording iTunes videos to Android OS Tablets & Phones for playing; this DRM Video Recorder will activate your iTunes automatically and start to play this video. The player windows cannot be removed or closed.

In the meanwhile, it will start to record this video in MP4 real-time. The conversion time is equal to the video length itself; you can do other tasks during the converting the process.

Note: The system volume could turn off temporally during this period; no worries, do not touch it to get perfect DRM removed video.

After the conversion, click “Open output folder” to quick locate the converted video.

conversion window How to Play and Watch iTunes Movies on Android Phone/Tablet

Tips:

1. The DRM removing process may mislead your anti-virus software to falsely report virus/worm. Please ignore the report to keep on ripping.

2. This product cannot convert unplayable video (damaged, unauthorized, etc).

How to transfer the converted iTunes M4V video to Android OS Tablets & Phones?

Windows transfer

1. Connect your device to the USB port on your computer. Its USB storage is mounted as a drive and appears on your computer screen.
2. Copy files back and forth as you would using any other external device.
3. When you finish, eject the device from within Windows before unplugging the USB cable.

Mac OS transfer

1. Install Android File Transfer from www.android.com/filetransfer, and follow the instructions there. (If you are using Android File Transfer for the first time, double-click it to open it. After the first connection, it opens automatically whenever you connect.)
2. Connect your device to your computer with a USB cable. Android File Transfer starts, if it’s not already running, and opens a window that displays the contents of your device, along with storage space details at the bottom of the window.
3. Work with this window much as you do in the Finder window: open and close folders, create new folders, and drag files to or from it and other Finder windows.
4. Disconnect the USB cable when you finish.

Related settings: To change your device’s USB connection options, touch Settings > Device > Storage > Menu > USB computer connection.

Related articles:

share medium How to Play and Watch iTunes Movies on Android Phone/Tablet

Have some disney 2D/3D Blu-ray collections? And want to get them ready for you Galxy Tab 3 with 3D effect? Follow this simple tutorial to learn how to convert 2D/3D Blu-rays to SBS 3D MP4 format for Samsung Galaxy Tab 3.

Walt Disney Home Entertainment has officially announced and detailed the Blu-ray release of DisneyToon Studios’ Planes, which is set to arrive via 2D and 3D BD/DVD/Digital Copy combo packs later this fall. The high-flying animated adventure features the voice talents of Dane Cook, Stacy Keach, Priyanka Chopra, Cedric the Entertainer, Julia Louis-Dreyfus and John Cleese, and streets on November 19th. Perhaps you may have got some Disney 2D/3D Blu-ray movies, and face difficulties to get these protected blu-ray files onto your Samsung Galaxy Tab 3 for playback on the go.

disney 2d 3d blu ray How to watch Disney 2D/3D Blu ray on Galaxy Tab 3 with SBS 3D effect?

Samsung Galaxy Tab does not carry a disc drive so that Blu-rays are not supported directly. Besides, most commercial Blu-rays are encrypted by film studio so that they cannot be copied. To watch Disney 2D/3D Blu-rays on Galaxy Tab 3, you need to rip blu-ray to Galaxy Tab 3 supported format first. And then to get the output video with 3D effect, the easiest way to convert 2D/3D Disney Blu-ray to side-by-side 3D MP4 video

Here, Pavtube 3D Blu-ray Ripper is the best 3D/2D Blu-ray to Side-by-Side 3D ripper to assist you with ripping Disney 2D/3D Blu-ray to side-by-side 3D MP4 for Galaxy Tab 3 playback with perfect audio and video synchronization. Mac users could use 3D Blu-ray Ripper for Mac which is specially designed for Mac users to create 3D SBS MP4 video out of 3D/2D Blu-ray movies.

Full Guide: Rip Disney 2D/3D Blu-ray movie to SBS 3D MP4 video for Galaxy Tab 3 playback?

(Tips: If you want to rip 2D/3D Blu-ray to side-by-side 3D MKV for playing on 3D devices, please refer to this guide: Rip 2D/3D Blu-rays to side-by-side 3D MKV for playing on a 3D Device)

Step 1: Load 3D/2D Blu-ray Disc.

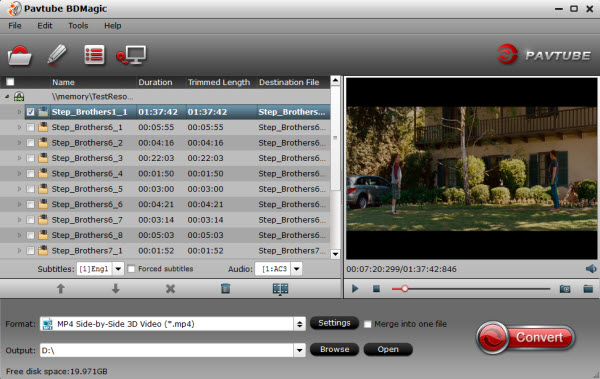
Open Pavtube 30% off BDMagic and load your source Blu-ray movie.

blu ray to sbs mp4 How to watch Disney 2D/3D Blu ray on Galaxy Tab 3 with SBS 3D effect?

Step 2: Choose suitable profile.

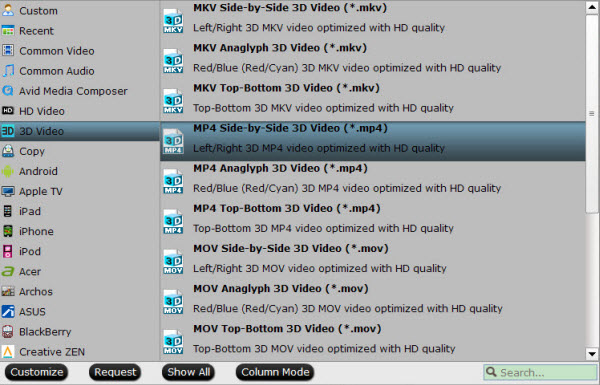
From the “Format” drop-down list, you are suggested to follow the path “3D Video > MP4 Side-by-Side 3D Video(*.mp4)” for ripping 2D/3D Blu-ray to side-by-side 3D MP4 video.

mp4 side by side 3d video How to watch Disney 2D/3D Blu ray on Galaxy Tab 3 with SBS 3D effect?

Step 3: Adjust profile presets (Optional).

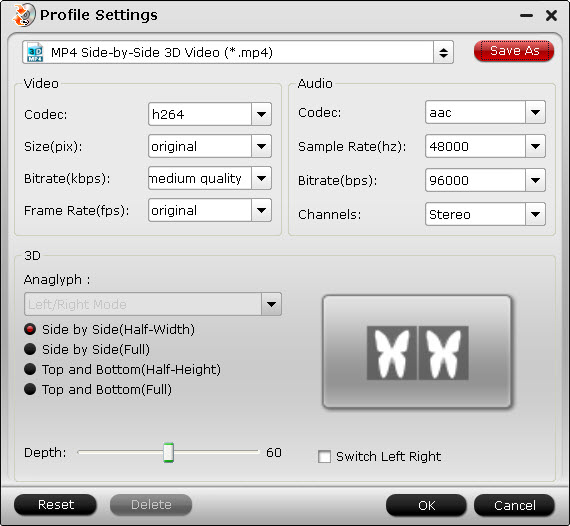
If you like, you could set profile parameters to get better video quality, such as video codec, file size, video bitrate, frame rate, etc.

bluray 3d sbs mp4 settings How to watch Disney 2D/3D Blu ray on Galaxy Tab 3 with SBS 3D effect?

Step 4: Start ripping 2D/3D Blu-ray to side-by-side 3D MP4 video for Galaxy Tab 3.

Double check above steps and you could click the “Convert” button on program interface to start ripping Disney 2D/3D Blu-ray to side-by-side 3D MP4 video for Galaxy Tab 3. After it finished, open output file destination, locate the created SBS 3D MP4 video and you could watch it on your Galaxy Tab 3 anytime and anywhere.

Read more:

Can Galaxy Tab 3 8.0 Play DVD (ISO/IFO image file)
Enable Galaxy Tab 3 to play MKV/AVI/VOB/Tivo/MPG/WMV/FLV/F4V video

share medium How to watch Disney 2D/3D Blu ray on Galaxy Tab 3 with SBS 3D effect?

How to Install Google Apps on the Kindle Fire HDX

November 6th, 2013 | Posted by mobmshare in Amazon | Tips and Reviews - (18 Comments)

What is a pity is that Kindle Fire HDX doesn’t add support for Google apps. So here offers you some tips and trick for the way for installing Google Apps on the Kindle Fire HDX. Just get the solution now.


Kindle Fire tablets HDX 7 and 8.9 inches, are a real bargain considering the provision incorporating hardware. The cons always come from the so closed software for your operating system modified. Although we install most existing Android applications, the applications Google are not. An Android enthusiast has been able to bring Gmail, Play Music, Google Maps, YouTube, Chrome and other applications. Kindle Fire HDX sports a high resolution screen, a very fast processor, and generally excellent media abilities, but one thing it lacks is support for Google apps.

Luckily for us Amazon still lets users install apps downloaded from sites other than the Amazon Appstore, because one blogger going by Android Cowboy has found a way to add Gmail and a few other Google apps to Amazon’s tablet.

His trick is similar to the hack which let me install Gmail, Google Reader, and other Google apps on the Kindle Fire HD last year. He’s gotten Gmail, Google Play Books, Chrome, and Google Search working on the Fire HDX, but at this point Google Play Store and Google+ still don’t work.

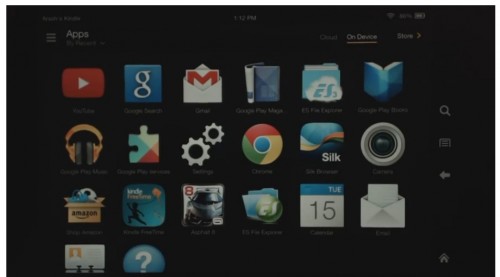
kindle fire HDX google apps How to Install Google Apps on the Kindle Fire HDX

Here’s how you do it.

First, you’ll need a file manager or some other way to access the install files on your Kindle Fire HDX. Amazon won’t let you do this via their setup, unfortunately, so I recommend that you head over to this post and install the 5 apps I suggested for the Kindle Fire HD. Or you could skip that and install ES File Explorer, an app which you can find in the Amazon Appstore on your Fire HDX.

Download the following files and transfer to your Kindle via USB connection to your PC. I suggest that you copy them to the “download” folder of the Kindle Fire HDX; it will be the easiest to find again.

Open the ES File explorer app and then open the download folder. Select and installGoogle Account Manager.
If you are prompted by a warning that app installs are blocked, follow the prompts to go to the settings menu and change the appropriate setting. Then go back to ES File explorer and try to install Google Account Manager again.
Reboot your Kindle Fire HDX by pressing and holding the power button and then selecting the shutdown option. Then restart it.

Install Google Services Framework.
Reboot.
Install Google Play Services.
Reboot.
Install Gmail.
Reboot.

At this point you should be able to open the Gmail app and log in to your account. You can ignore any warning messages.

Once you’ve logged into your Gmail account you can then download and install other Google apps. If you need help finding the apps, check out the 1Mobile app store. That is one of the better sources of free apps, including reading apps, utilities, and even Google apps.

Last year I reported on a similar trick which let me add Google apps to the Kindle Fire HD, but unfortunately it turned out to be less useful than I had hoped. The Kindle Fire HD (2012) didn’t support notifications and running Google apps in the background, and as a result some apps (Gmail, for example) would only check for new content when they were open.

I am concerned that the HDX might have the same issue. I’d love to hear back from anyone who tries this. How well did it work? Hope it helps~

Source: The Digital Reader

Read more:

Convert and Play DVD on Kindle Fire HDX 7/8.9
Download, Transfer and Sync media Files to Your Kindle Fire HDX

share medium How to Install Google Apps on the Kindle Fire HDX

How to Transfer Videos from iPad Air to Computer

November 5th, 2013 | Posted by mobmshare in Apple | Transfer - (3 Comments)

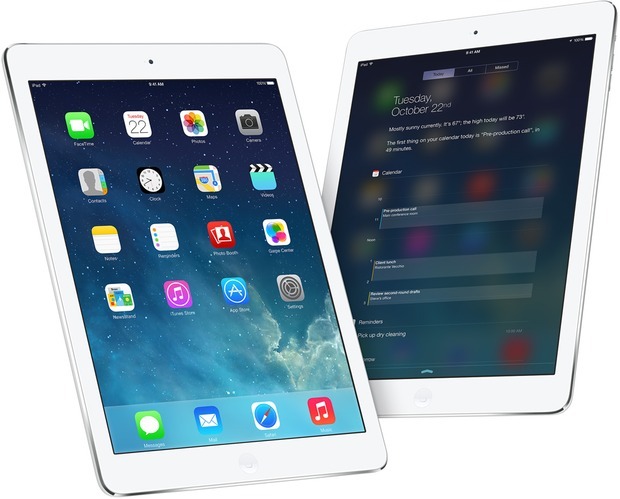
Just bought the new iPad Air? Has it ever occurred to you that it is troublesome to transfer videos from iPad Air to computer because Apple need to keep iTunes customers from copying DRM files. Well, we have some easy solutions.

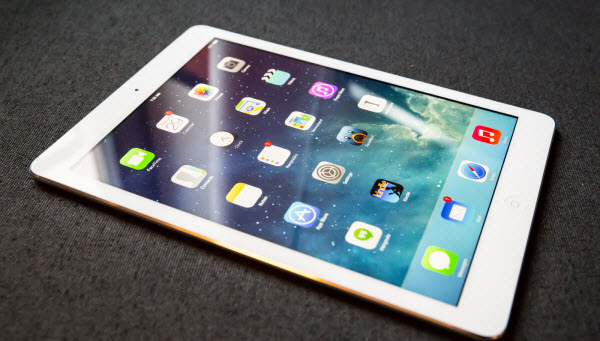
ipadair How to Transfer Videos from iPad Air to Computer

Everyone knows Speaking at today’s launch event in San Francisco, Phil Schiller announced the next iteration of the company’s tablet. It’s thinner, lighter and more powerful — hence the new name: the iPad Air Air. (No more of that “new iPad Air” nonsense.) And Cupertino takes that moniker seriously; this slate weighs just one pound (down from the fourth-gen model’s 1.4 pounds). When you need to backup and transfer videos from iPad Air to your PC computer or Mac, how to do it?

My friend gave me a suggestion, he said that maybe you can transfer movies to iCloud. First,you can backup your ipad air movies to the iCloud, and then you can extract movies from iCloud to your Computer, this is a good way!

Sometimes you want to transfer some data to computer for backing up or watch or edit videos on computer! So here we will tell you how to transfer videos and music from iPad Air to computer, no matter whether them are purchased from iTunes or not!

Transferring with iTunes and iCloud

This method is for transferring those purchased videos and music from iTunes.

With iTunes

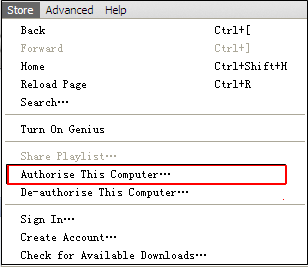
1. To make sure to authorize your computer before connecting iPad Air, follow the steps (“Store“menu, choose Authorize Computer and enter Apple ID and password).

authorise How to Transfer Videos from iPad Air to Computer

2. Connect your iPad Air to the computer.

3. Click the Transfer Purchases button.

You can right-click (Windows or Mac) your device in the iTunes Source list, then choose Transfer Purchases from the shortcut menu that appears.

transfer How to Transfer Videos from iPad Air to Computer

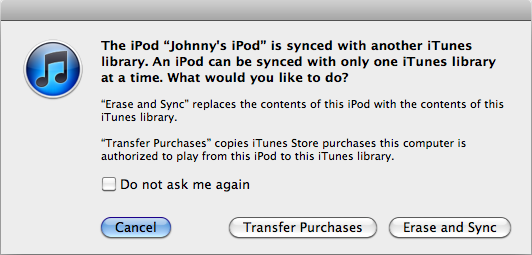
If you connect your iOS devices for the first time, one dialog may appear automatically as follow , you just click the Transfer Purchases button.

sync issue How to Transfer Videos from iPad Air to Computer

With iCloud

iCloud is a wonderful service for sharing or backing up your data, so you also can transfer videos and music with it. First of all, you should share your data onto iCloud. Then you need to download from iCloud again to computer. In addition, it requires lots of wireless data to finish the process. So if transferring with iCloud, you have better make sure the Wi-Fi is available for your iPad Air.  It is teach you How to transfer movies iPad air to your Computer. You can try it for free. Good luck!

Having many halloween video collections, want to convert these movie files to your iPad Air for playback, now follow the artcicle below:

Rip/Convert Blu-ray Movies for enjoying on iPad Air
Convert MKV, AVI, Tivo, VOB, WMV, MPG, FLV to iPad Air
Transfer and Play DVD movies on iPad Air
Get Sony 4K XAVC/XAVC S Files onto iPad Air for playback 

share medium How to Transfer Videos from iPad Air to Computer

How do I watch a DVD movie on my iPad Air?

November 2nd, 2013 | Posted by mobmshare in Apple - (12 Comments)

If you want to download DVD to iPad Air with itunes, you will need to remove DVD protection and then convert DVD to iPad Air MP4 format with a easy-to-use and fast DVD to iPad Air Converter.

Apple finally released the fifth-generation tablet iPad Air alongside the iPad Mini 2 with Retian Display on October 22, 2013, just weeks after the sensational iPhone 5S and iPhone 5C launch event. This time iPad Air is slimmer and narrower than its brothers, while remaining the existing 9.7-inch screen size. With that in mind, it is tempting to get this glamorous gadget for watching DVD movies and videos on its HD retina display.

But how about streaming protected DVD to iPad Air? Is that possible?

The answer is yes. DVDs is written and protected with various copy protection technologies. To watch DVD on iPad Air, only two steps needed to realize this: backup protected DVD to your computer, and then streaming the protected DVD you have ripped to iPad Air.

To rip DVD for iPad Air, you need DVD to iPad Air Converter which is a professional DVD Ripper to remove disc encryption. With intuitive and easy-to-navigate interface, this program can easily rip DVD to iPad Air friendly format. This iPad Air DVD Converter is just such kind of easy-to-use program to help you do the conversion in a few clicks. Therefore, you can import any DVD to iPad Air for watching at will.

Besides ripping DVD to iPad Air, Pavtube DVDAid also boasts the robust function of converting DVD to popular video formats, be it AVI, MOV, MP4, FLV, MKV, MP3, etc, as well as ripping DVD movies to iPhone 5C/5S, iPod, Galaxy S4, HTC One, Google Nexus 7, Surface, PSP and more, thoroughly catering to diverse DVD ripping and converting demands.

Good News! Pavtube Release a New Site – multipelife.com with Product Migration and Name Change.

Its bestselling software products DVD Ripper has now become DVDAid, and Blu-ray Ripper has been renamed as BDMagic. And to thanks for your continued support all along our previous site and the new www.multipelife.com, we are holding a ‘New Site Special’. You can get 40% off DVDAid on Windows/Mac platform:

https://www.facebook.com/pavtubefans/app_209569249055691

Read more:  http://open-mobile-share.com/pavtube-release-a-new-site/

Step-by-Step Guide to Rip DVD to iPad Air with Decent Quality

Reach the Mac version of DVD to iPad Air Converter. Here we take Windows version as example. For Mac users who want to convert DVD to iPad Air on Mac, please download the windows version and then follow the guide (the operations for two versions are basically the same).

Tips:

If you have any requirements of outputting 3D (Anaglyph, T/P, SBS) or keeping multiple audio tracks/subtitles, you are suggested to try this Blu-ray/DVD to iPad Air Converter Pro.

Tutorials: How to transfer DVD to most compatible MP4 preset for iPad Air

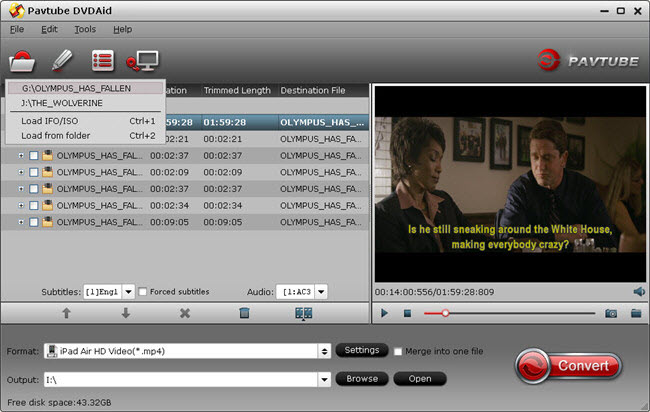
1. Run this Pavtube DVDAid and the DVD to iPad Air Converter; load disc.
Click the top left icon, you can choose to import DVD from ROM, DVD folder or DVD ISO/IFO. It will check the main title by default; moreover, ISO files could also be recognized automatically so that you no longer need to run virtual drive to mount it.

dvdaid load disc How do I watch a DVD movie on my iPad Air?

2. Choose format.

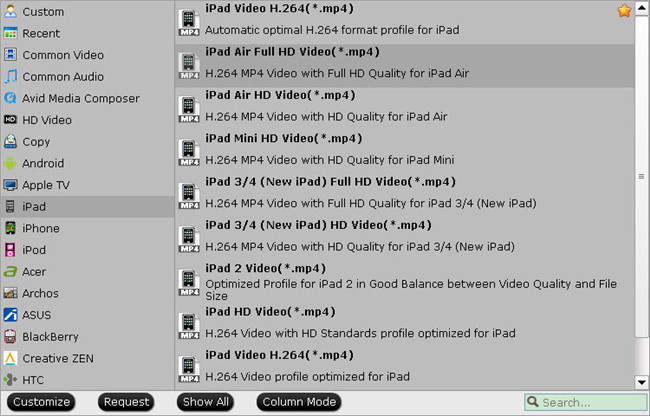
Click “Format” drop-down list and choose “iPad>iPad Air Full HD Video(*.mp4)” as the compatible MP4 preset with best video quality. (Download a patch here to get the iPad Air preset). The preset is specially designed for iPad Air perfectly.

dvdaid video format How do I watch a DVD movie on my iPad Air?

3. Start Conversion.

You can hit the big red “Convert” to start converting DVD to iPad Air MP4 with best video settings. After the conversion, click “Open output folder” in the conversion window, or “Open” in main interface to quick locate the converted video.

After getting the converted movies files, you can transfer them to new iPad Air via iTunes. If you don’t know how to put and play movie onto new iPad Air , just follow the steps to realize it:

1) Make sure you have install iTunes. If not, you can free download iTunes here at first. And launch the iTunes.
2) Connect iPad Air to Mac/PC.
3) Choose “File –> Add File to Library…”
4) Drag the .mp4 file you want to the iPad Air icon

How to transfer media files from iTunes 11 to iOS devices

So there you have it. Prette simple. Now, you can enjoy and view DVD movies on iPad Air anytime everywhere for great digital fun.

Additonal Tips:

1. If your movie isn’t already in one of the iPad Air supported formats or it’s still on a DVD or a Blu-ray, you can get the Video Converter Ultimate (or the iMedia Converter Mac) which can help you convert Blu-ray/DVD/ISO/IFO and various formats of 720p/1080p HD videos in MKV, AVI, TiVo, VOB, MPG, MTS, etc. to your iPad Air, iPhone 5C, iPhone 5S, iPad 3, iPod 5, Apple TV 3 and other iOS/Android/Windows 8 tablets/phones for smoothly playing. (Both are 20% off now)

Related Articles:

How do I play .mkv format movies on my iPad Air?
Put MKV, AVI, Tivo, VOB, WMV, MPG, FLV to iPad Air
Rip/Stream Blu-ray movies to Apple iPad Air

share medium How do I watch a DVD movie on my iPad Air?

Rip Blu-ray to Apple TV 3 with AC3 5.1 audio on Mac

October 31st, 2013 | Posted by mobmshare in Apple - (2 Comments)

This article shows you a brief guide to convert Blu-ray movies to iTunes 11 for streaming to Apple TV 3  with Dolby Digital Copy 5.1 surround sound on Mac with ease.

I owned 5 iDevices, and I often use them for entertainment like email, music, video, ebooks. Now I have some Blu-ray collections, to get these Blul-rays played on my Apple TV, iPhone, iPad with AC3 5.1 audio. I have used Aiseesoft Blu-ray Ripper for Mac, but my current Blu-Ray Ripper was not good for some disks and 5.1 output formats. I’m looking for the best Blu-ray Ripper for Mac to do 5.1 conversion to my Apple device mainly on my Apple TV 3? Is there any way?

As you know, Blu-ray disc or even the decrypted Blu-ray rips can’t be supported by Apple TV 3. You may also meet the similar problems as above. So in this tutorial, I will introduce and share an easy way to rip Blu-ray to iTunes format for streaming to Apple TV 3 for full HD enjoyment with AC3 5.1 channel on Mac.

Free download and install it: Pavtube BDMagic for Mac which can help you convert Blu-ray to iTunes compatible format then sync to ATV 3 for playback without any limitation. I’ve found the quality to be excellent, and see no difference when compared to playing the discs themselves. The sound can be kept with the original Dolby Digital 5.1 surround sound. For ripping Blu-ray to iTunes for ATV 3 on Windows, please turn to BDMagic. Now download the program and follow the steps below to transfer your Blu-ray movies to iTunes 11 and Apple TV 3 h.264-compliant videos with AC3 5.1 audio.

How to convert Blu-ray to iTune 11 for streaming to Apple TV 3 with AC3 5.1 audio?

1. Load Blu-ray source.

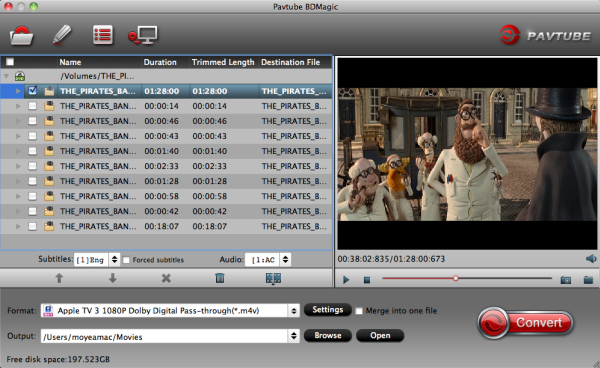
First of all, insert your Blu-ray to Blu-ray drive and keep networked. Now it’s time to import Blu-ray into the software after launching it.

Click “Load files” icon to choose Blu-ray source for importing.

blu ray to apple tv Rip Blu ray to Apple TV 3 with AC3 5.1 audio on Mac

2. Choose output format..

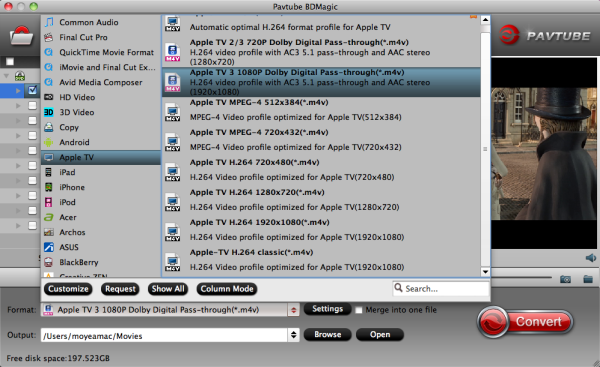
In the dropdown list of Format menu, you can find several Apple TV options for output. This Blu-ray to iTunes Conveter has a number of presets for Apple TV, Apple TV 2, and Apple TV 3rd Generation, to export a Apple TV 3 1080p video with ac3 5.1 pass-through for AV receiver decoding, “Apple TV 3 1080P Dolby Digital Pass-through (*.m4v)” preset is highly recommended.

apple tv format1 Rip Blu ray to Apple TV 3 with AC3 5.1 audio on Mac

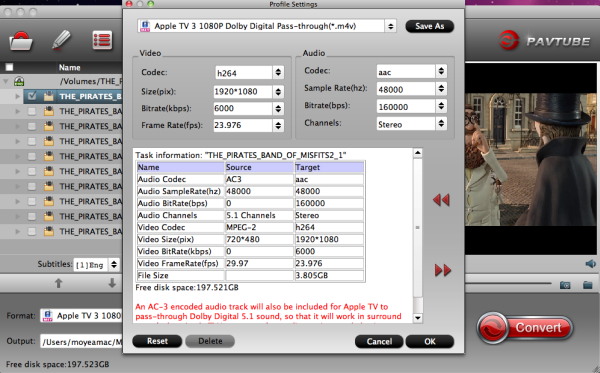
Tip:  If you are not satisfied with the default settings, click the “Settings” button, you can change the settings by yourself. You can change the video size (pix), bitrate, audio channels, etc. Just remember the file size mainly depends on the bitrate, which means the higher bitrate you set, the bigger size you get.

apple tv settings1 Rip Blu ray to Apple TV 3 with AC3 5.1 audio on Mac

3. Convert Blu-ray to iTunes 11/Apple TV 3 video

Click Convert button to rip Blu-ray to iTunes 11 recognized video for playing on Apple TV 3 generation with Dolby Digital 5.1 surround sound pass-through. Afterwards, transfer the Blu-ray to iTunes and import to Apple TV 3 for watching with ease. There you have it! Now it is time to enjoy your favorite Blu-ray movies with Apple TV 3.

Apple TV Related Articles:

Transfer Internet torrents movies to Apple TV with with high quality
View Blu-ray/DVD/VCD on Apple TV (Apple TV 3) with 1080p format
Downloading TiVo files to Mac for Apple TV 3, iPad and iPod Streaming

share medium Rip Blu ray to Apple TV 3 with AC3 5.1 audio on Mac

 In this article, you will learn the best way to convert MKV, AVI, Tivo, VOB, WMV, MPG, FLV to iPad Air supported video format, and transfer these movies or videos to iPad Air for playback.

Apple introduced two new iPads this month at a special event in San Francisco on October 22, and the first of those to go on sale is the iPad Air, which is in stores and on virtual shelves this Friday, November 1. The screen on the iPad Air is a Retina display, which means that when viewed from a standard distance, the human eye shouldn’t be able to make out individual pixels. The actual pixel density of that 2048 x 1536 9.7-inch display is 264 PPI, which is much less dense than the iPad mini, but you’d have a hard time telling the difference when you’re actually using the thing. In short, both are excellent, and lead the market in terms of quality when you factor in color rendering, viewing angle and other visual attributes.

video to ipad air Put MKV, AVI, Tivo, VOB, WMV, MPG, FLV to iPad Air for watching freely

Video shines on the iPad Air, as does image-rich content like comic books and photos, and no doubt it is great for watching videos on iPad Air, but as we know, Apple’s devices or iTunes don’t support most video formats. In fact, iPad Air supported video formats are limited to .mp4, mov and m4v, which means there will be many videos in different file format like MKV, AVI, Tivo, VOB, WMV, MPG, FLV, etc can’t be played with this devie. And that comes to our discussion today: how to convert MKV, AVI, Tivo, VOB, WMV, MPG, FLV to iPad Air, what video converter is good for iPad Air.

Here I’d like to introduce Pavtube Video Converter Ultimate I’m using, an easy-to-use and yet professional video convert program to do the finish task. It work well in converting MKV, AVI, Tivo, VOB, WMV, MPG, FLV to iPad Air supported format like MP4 format and then copy them to the iPad Air using iTunes.

It is a professional video converting program which is able to outputting 720p/1080p videos with the simplest workflow and reliable video quality. For Mac users, please turn to iMedia Converter for Mac.

Good News! Pavtube Release a New Site – multipelife.com with Product Migration and Name Change.

To thanks for your continued support, we are holding a ‘New Site Special’ with fantastic discounts. You can get 20% off Video Converter Ultimate on Windows/Mac platform now.

Read more: http://open-mobile-share.com/pavtube-release-a-new-site/

Download a free trial version:

Guide: Converting  MKV, AVI, Tivo, VOB, WMV, MPG, FLV to iPad Air friendly format

Step One. Add videos to iPad Air Video Converter.

Click “Add Video” icon to add your source videos, or drag-and-drop them directly.

ultimate video converter Put MKV, AVI, Tivo, VOB, WMV, MPG, FLV to iPad Air for watching freely

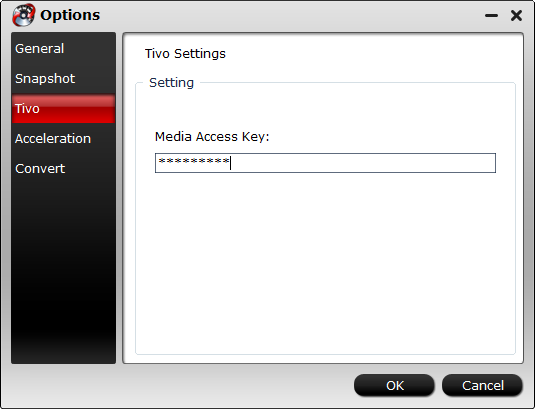
Pls note that if you import a Tivo file, you will be asked to submit Tivo key in the pop-up window.

tivo option Put MKV, AVI, Tivo, VOB, WMV, MPG, FLV to iPad Air for watching freely

Step Two. Choose target video format.

Click the drop-down list on the bottom, we can see various presets for iPhone, iPad, iPod, Android phones/tablets, editing programs, Xbox360, etc. Let’s click “iPad” on the left, and then we will find all the presets for different models of iPad.

To get best video quality on iPad Air, you are suggested to choose “iPad Air HD Video(*.mp4)” as the target video format at your needs. To get the preset, you should also install the Patch in advance, but now only windows version have the patch file.

ipad air video format Put MKV, AVI, Tivo, VOB, WMV, MPG, FLV to iPad Air for watching freely

Step Three. Customize video specs. (Optional)

Click “Settings” to open profiles settings window. Here you are able to customize video size, bitrate, frame rate, sample rate(Hz)…all the specs can be fixed manually. A personal tip: the higher bitrate you choose, the better video quality will be; and you will get videos in larger size.

Step Four. Start Conversion.

Go ahead and hit the “Convert”. It will pop up a conversion window with detailed prorecess. Wait for moments, you can click “Open output folder” to locate the converted video directly. Or you can check “shut down computer after conversion” and just leave it running.

Notes: Here is tips for transferring converted video to Apple iPad Air

To put videos, music and photos to Apple iPad Air, iTunes 11 is a must. You can download iTunes 11 and follow the steps below to put Video, DVD, Blu-ray movie to iPad Air. If you use manual syncing, you can sync items from more than one iTunes library to your iPad Air. Follow the instructions below to manually sync movies to iPad Air in iTunes 11.

1. Open iTunes 11, and press “File” -> “Add File to Library” to add movies to iTunes Library. Or just switch to Movie library, and drag the file to iTunes. (How to add local contents on your computer to iTunes)

add to library Put MKV, AVI, Tivo, VOB, WMV, MPG, FLV to iPad Air for watching freely

2. Connect iPad Air with your Mac using the cable that came with your device.

3. Click the Summary button and select “Manually manage music and videos”.

4. Click the On This Device (your iPad Air name) button.

5. Click Add To on the right side of the iTunes window.

6. Switch to Movies Drag items from the left side of the iTunes window to the pane on the right.

itunes 11 library list Put MKV, AVI, Tivo, VOB, WMV, MPG, FLV to iPad Air for watching freely

Related Articles:

Rip/Stream Blu-ray movies to Apple iPad Air
Top IOS Device- iPad Air vs iPad 4 vs iPad 2: specs comparison
iPhone 5C Review & Video Tips: Convert DVD to iPhone 5C

share medium Put MKV, AVI, Tivo, VOB, WMV, MPG, FLV to iPad Air for watching freely

Kindle Fire HDX vs Kindle Fire HD: What’s the difference?

October 29th, 2013 | Posted by mobmshare in Amazon | News - (11 Comments)

This article gives the difference between Kindle Fire HDX and Kindle Fire HD.

Amazon has announced that the new Kindle Fire tablets are now available in the UK, following US launch in September, bringing you all the goodness of Amazon in a glossy new device. It’s going under the name Kindle Fire HDX, with that X, you guessed it, meaning it’s packing in more pixels on that display.

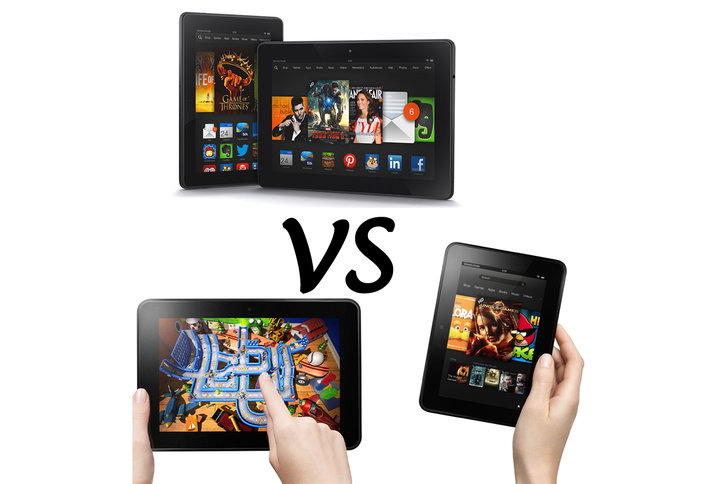
kindle fire hdx and kindle fire hd difference Kindle Fire HDX vs Kindle Fire HD: Whats the difference?

At the same time, Amazon has updated the 7-inch Kindle Fire HD for 2013, while the 8.9-inch Fire HD launched earlier in the year remains untouched.

In this array of Kindle Fire HDs and HDXs, some new, some not, what’s the real difference? With this latest update, what is Amazon changing and should you hold fire, or charge right in?

Displays

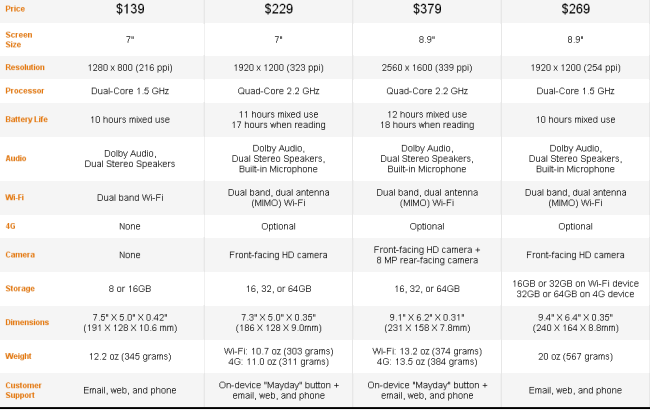
The Amazon Kindle Fire HDX comes in two sizes: 7-inch and 8.9-inch, offering a 1920 x 1200 pixel resolution display (323ppi) on the 7-inch and 2560 x 1600 (339ppi) on the 8.9-inch. At that resolution, the 8.9-inch HDX has the sharpest display around, while the new 7-inch HDX matches the Nexus 7 (2013) for pixels.

The Kindle Fire HD (2013) – that’s the new version – has a 7-inch 1280 x 800 (216ppi) display, whilst the Fire HD 8.9-inch has a 1920 x 1200 (254ppi) display. Naturally, the higher pixel density displays of the HDX will give you more detail, with the 8.9-inch HDX looking like the real star in the pack.

Power and battery

The Kindle Fire HDX models have a 2.2GHz quad-core Snapdragon 800 processor, the same sort of thing as you’ll find in the LG G2 or Samsung Galaxy Note 3. That means oodles of power on offer on both the 7-inch and 8.9-inch models, both with 2GB of RAM.

The Kindle Fire HD models both at 7 and 8.9-inches settle for a 1.5GHz dual-core processor. The HDX will be faster, but Amazon also reports that the Kindle Fire HDX will offer slightly longer battery life. Not bad considering the step-up in display and power. It’s aided by a new software feature designed for reading, which shuts down non-essential hardware to extend the battery to 17 hours if reading alone.

Cameras

The camera isn’t the most important part of a tablet in our opinion, but you still see a large number of people using them to take photos: the Kindle Fire range hasn’t had a rear camera until now. The Kindle Fire HDX 8.9 has a rear 8-megapixel camera, as well as a front-facing camera.

Both the Kindle Fire HD 8.9 and the new Kindle Fire HDX 7-inch offer front-facing cameras, while the new 7-inch Kindle Fire HD (2013) has no camera at all.

Connectivity

Kindle is known for being well connected and the wide range of clever features, like Whispersync, that come with it. The new 7-inch Kindle Fire HD (2013) is the only model without the option for 4G. It also misses out on the dual-antenna Wi-Fi that the others offer. If connectivity is key, so you might want to avoid the 7-inch Kindle Fire HD and pick one of the others.

Software

The Kindle Fire HDX and 7-inch Kindle Fire HD (2013) debut with the latest Fire OS3 software. The Kindle Fire HD 8.9 doesn’t have that update and there’s no word on if it will.

Fire OS3 brings a range of features to the Kindle Fire HD and HDX family, including a new Mayday button for instant customer service support, second screen features, better touch response, X-Ray for music, a new reading mode that powers down hardware that’s not needed to extend the battery life and much more.

Size and weight

Weight is an important factor for tablets, especially if you’re going to be lying in bed holding it while watching Breaking Bad on Netflix. The lightest of the lot is the 7-inch Kindle Fire HDX with Wi-Fi at 303g. The heaviest is the old 8.9-inch Kindle Fire HD. Weighing in at 567g, that’s going to be a real strain on your wrist after a while.

The 8.9 Kindle Fire HDX comes in at 374g, which is impressive. It’s also only 7.8mm thick, making it the slimmest of the bunch. It’s a whole 278g lighter than the iPad.

Compare Kindle Fire tablets:

kindle fire compare Kindle Fire HDX vs Kindle Fire HD: Whats the difference?
campare kindle fire Kindle Fire HDX vs Kindle Fire HD: Whats the difference?

Summary

There’s a wide range of options available in the Kindle Fire HD family now. The HDX models obviously bring the advantages of more power and more pixels. If you’re looking at gaming on your Kindle Fire, the power-hungry games like Real Racing 3 will load faster and you’ll squeeze out more detail. The Kindle Fire HDX is what you want.

If you’re looking for something for casual browsing at home, then the Kindle Fire HD might save you a few bucks. But bear in mind, the 8.9-inch Kindle Fire HD, is much more weighty than the HDX – if you’re going to be holding it up to view, then you might want to find a little more cash for the top model.

The Kindle Fire HD 7-inch (2013) starts at $139/£119, the Fire HD 8.9-inch starts at $269/£229. The Kindle Fire HDX 7-inch starts at $229/£199, the HDX 8.9-inch is $379/£329.

More Related:

Play MKV, AVI, VOB, Tivo, WMV, MPG, FLV, F4V on Kindle Fire HDX 7
Put and play new released Blu-ray/DVD movies on Kindle Fire HDX 7
Get DRM protected Digital Copy onto Kindle Fire HDX 8.9
Sync iTunes movies to Kindle Fire HDX
Kindle Fire HDX File Transfer

share medium Kindle Fire HDX vs Kindle Fire HD: Whats the difference?

Rip/Stream Blu-ray movies to Apple iPad Air

October 28th, 2013 | Posted by mobmshare in Apple - (25 Comments)

The article is mainly about how convert Blu-ray movie to iPad Air. It will provide an easy but effective solution.

Apple choose to release the iPad Air with the same thickness, thin side bezels and symmetrical speaker grilles as the iPad mini, as well as a similar aluminum unibody and less-tapered back for an easier grip. With this new form factor, the iPad Air is significantly lighter than its predecessors at just 1 pound, which makes it the lightest tablet currently on the market.

iPad Air Smart Cover Rip/Stream Blu ray movies to Apple iPad Air

The Apple iPad Air brings a new name, new design and more power. It received the new Apple A7 chipset along with the M7 motion co-processor. The other major upgrade is the design – it’s based on the iPad Air and has narrower bezels (43% smaller) that make the tablet easier to handle. The tablet is 20% thinner and now measures just 7.5mm, thinner than the iPad 2. The weight also went down big time – from 653g to 469g. Other than that you get a 9.7″ IPS LCD screen with 1536 x 2048 pixel as before. The iPad Air didn’t get the TouchID sensor either, but we doubt anyone will miss it. Color options are Silver and white and Space gray and the storage options go all the way up to 128GB (starting at 16GB and doubling at each step).

Wanna play HD videos on iPad Air with favorite Blu-ray movies? The retina display of iPad Air make it easier to enjoy HD videos. However, like DVD, Blu-ray has to be played with an exclusive Blu-ray player. And the copyright protection prevents users to copy the digital content in the disc directly. If you want to watch your favorite Blu-ray movie on iPad Air, what should you do to achieve it?

The most important thing is to get a powerful Blu-ray Ripper- Pavtube BDMagic to help you to convert Blu-ray movies to iPad Air support format. In this way, you can watch your Blu-ray movies at any time without carrying the physical Blu-ray disc. Most of you may consider using excellent free Handbreak which is good at ripping standard Def DVDs excluding commercial DVDs. while the latest version of the software has added SOME support for reading Blu-ray folder structures, it cannot yet decrypt the Blu-ray discs the way it can with regular DVDs for ripping your Blu-ray. So you need to find a more professional one.  Due to fast speed and easy-to-use workflow, you will finish converting Blu-ray to Apple iPad Air quickly in only few steps.

If you are Mac users, Pavtube BDMagic for Mac is the best tool for you.

Good News! Pavtube Release a New Site – multipelife.com with Product Migration and Name Change.

Its bestselling software product Blu-ray Ripper has been renamed as BDMagic. And to thanks for your continued support, we are holding a ‘New Site Special’. You can get 20% off BDMagic on Windows/Mac platform now.

Read more: http://open-mobile-share.com/pavtube-release-a-new-site/

Download Pavtube BDMagic and install it on your PC. 
Then follow below brief guide to make Blu-ray playable on iPad Air.

1. Insert Blu-ray on Blu-ray drive and import it to the software.

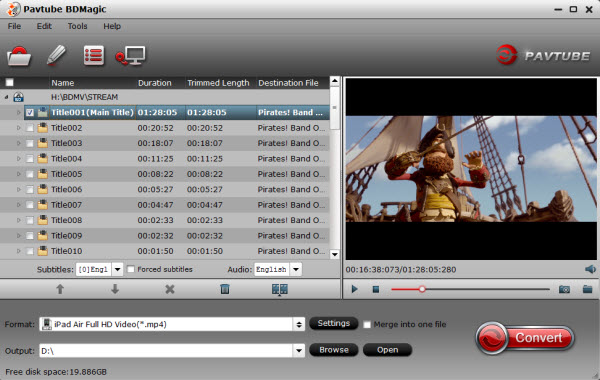
When you launch this Blu-ray to iPad Converter software, you should make sure that you have inserted Blu-ray to your Blu-ray drive. Then click the “Load file” button to import the Blu-ray you want for iPad Air.

blu ray to ipad air Rip/Stream Blu ray movies to Apple iPad Air

After loading Blu-ray successfully, the actual main title will be picked by the software and you can preview the entire movies on the preview window and take snapshot. Now go to choose the subtitle and audio you need for output for default setting for subtitles is none.

2. Choose video format for iPad Air.

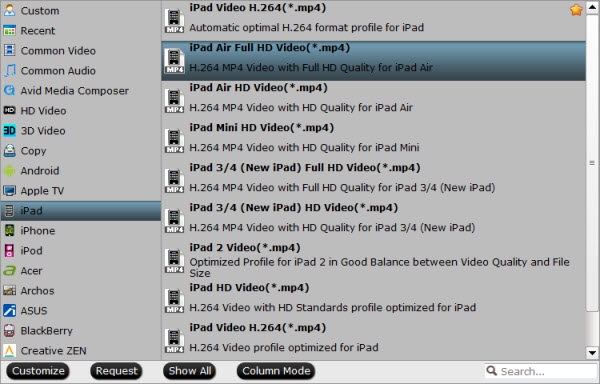
Click “Format” menu to get the output video format list. A mass of formats are listed. Go to choose “iPad Air HD Video” from “iPad” option for output. To get this special profile, you need to downlaod a patch here,  but now only windows version have the patch file.

ipad air format Rip/Stream Blu ray movies to Apple iPad Air

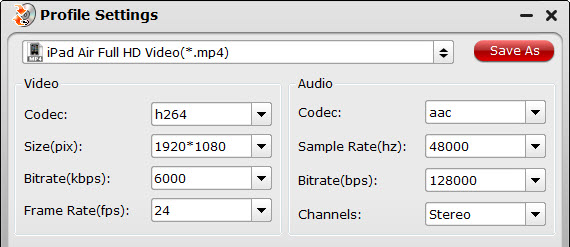
If you want to check and choose the codec, bitrate, channels, etc for output videos, you are free to click “Settings” button to get it done. Take note that the default settings are also made for high quality output videos if you are not good at it. (Optional)

ipad air settings Rip/Stream Blu ray movies to Apple iPad Air

  • Tips: If you want to keep multiple audio tracks and subtitle streams when ripping Blu-ray to MKV, MP4 and MOV, you can try to use Pavtube ByteCopy for Windows or Mac.

3. Convert Blu-ray for iPad Air.

Click “Convert” button to start convert Blu-ray to iPad Air. Once completed, “Open” button will help you to get output files quickly.

Tips: It has powerful edit functions such as trim video for your needed length, crop video to get rid of annoying black edges, join multiple video clips into one, add text/image watermark and add subtitles. For example, if the original Blu-ray movie has no subtitle or the subtitles you need, you can download it from website and then add it into the output videos for full enjoyment with this software.

Now it’s time to transfer Blu-ray to your iPad Air. Copy the generated video to iTunes and then sync to your portable devices. Go to enjoy it.

Related Tips:

MakeMKV vs ByteCopy vs DVDfab
Best DVD Ripper Review for Android Phone/Tablet
Backup DVD discs to Hard Drive keeping original structure

share medium Rip/Stream Blu ray movies to Apple iPad Air